ADFS v2

Clarifying the Relationship Between SharePoint 2010 and AD FS 2.0

I was teaching an AD FS class internally here at Microsoft a few weeks ago, and during the class I covered SharePoint  2010 integration with AD FS. While there are lots of great materials out there that talk about the technical aspects of  how to set up the trust and send claims, there isn't much that really clarifies the concepts. So I just want to take a few  minutes and describe what happens conceptually, as it impacts your deployment and configuration of claims-based  SharePoint.

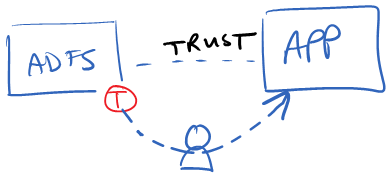
When a trust is established between AD FS and a typical (if there is such a thing) claims based application, the  application will accept the token from AD FS, verify it's signature, extract the claims, and use them.  A typical trust looks  something like this:

But the trust between AD FS and SharePoint, really looks something more like this:


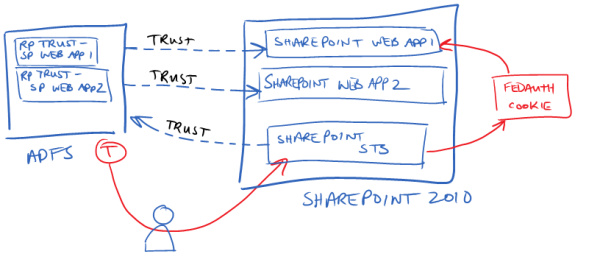
Here, we have 2 different web apps in SharePoint, and therefore there are two different trusts from the perspective of the AD FS server. AD FS is going to create a unique token for each web app with different claims in each. However, the web apps themselves don't trust the tokens that AD FS sends to them. Instead, the SharePoint STS is what trusts the tokens that AD FS sends. Or to rephrase it another way, AD FS thinks that it is sending tokens to 2 different applications, but in reality it's not sending the tokens to either - it's sending them to the SharePoint STS.

The 3rd trust (the one that points from the SharePoint STS to the AD FS server) is the SPTrustedIdentityTokenIssuer object that you create in SharePoint. This type of design has some interesting side-effects. First, SharePoint can only have one SPTrustedIdentityTokenIssuer object for an AD FS server. Therefore, if you want different claims for each web app, you need to define the aggregate set of those claims on the SPTrustedIdentityTokenIssuer. To clarify, let's say that I want an "EmailAddress" claim in WebApp1 and an "Role" claim in WebApp2. The SPTrustedIdentityTokenIssuer object has to be configured with at least 2 claim mappings - one for "EmailAddress" and another for "Role". However, neither application is using both of them.

One of the interesting outcomes of this model is that from the application's viewpoint, there is a "pool of claims available" from the AD FS STS. Every application sees the same "pool of claims". However, if AD FS doesn't send that claim over for that particular web app, then the web app won't receive it even if it's expecting it. To visual this - imagine that I'm a user in WebApp1 and I'm defining a permission on a document library. As shown in the following image, I have 3 claims available. These are the same claims that every application sees, because it's "pool of claims" defined as "Claim Mappings" on the SPTrustedIdentityTokenIssuer object in SharePoint.

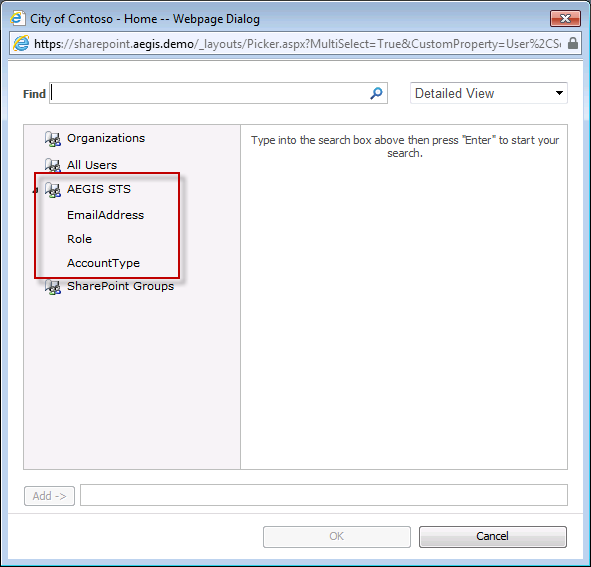
However, my Relying Party trusts in AD FS may not be configured to send all three claims for every application. So even though the end user may think that all of these claims are available for them to use, they may not be. This can be very confusing to the user - and is one of the reasons why you need to use a custom claims provider in almost every claims-based SharePoint 2010 deployment.

The FedAuth cookie box on the right of second diagam is another interesting quirk of how this trust works. In SharePoint, the STS does not send a SAML token to the web app. Instead, the STS creates the FedAuth cookie (a standard cookie used in WIF for the identity session state) which has an encrypted copy of the SessionSecurityToken object. This is the .NET object that is created by WIF after the SAML token is received, verified, and the claims are pulled out of it. So after the token is POSTed from AD FS back to the SharePoint STS, the SharePoint STS creates the FedAuth cookie and then issues a 302 redirect back to the user, which redirects the user to the original web app with their FedAuth cookie in hand. The SharePoint web app receives the cookie when the user request comes back to it and it uses WIF to extract the SessionSecurityToken object from the cookie and goes through the process of converting the identity into something that SharePoint can use internally.

So the relationship between AD FS and SharePoint is quite a bit different than other applications. If you can understand how this works, it will help you make better decisions about how to design your claims architecture in SharePoint.

PowerShell Attribute Store for AD FS 2.0

*WARNING: Academic exercise only – I’m not sure how this would scale in production*

Download the PowerShell Attribute Store

So I was at an event last week and a buddy of mine told me that he had an intern create an attribute store for AD FS that would provision an AD account if one didn’t exist. I got to thinking about this, and I thought why stop at provisioning accounts?  Why not have an attribute store that you can use to call any PowerShell script that you want and return the results as strings that you can use in claims.

So I went back and wrote it up and decided to share it with everyone. Feel free to download the attribute store and try it out.  It’s really simple – here’s how it works:

  1. Create the PowerShell Attribute Store in AD FS
  2. Create the PowerShell script.  In the script, pass the string that you want to give back to AD FS with the Write-Output cmdlet
  3. Create a claim rule that calls the attribute stor. Pass in a query string in the following format:

FULL_PATH_OF_SCRIPT;SCRIPT_PARAMETERS

I’ll illustrate how to use the PowerShell Attribute Store with an example. In this example, I’m going to get the size of the user’s home directory as a claim.

Example: Getting the User’s Home Directory Size as a Claim

Step 1: Install the PowerShell Attribute Store DLL

Download the PowerShell Attribute Store and copy the file PshAttrStore.dll into your AD FS installation folder. For example, C:\Program Files\Active Directory Federation Services 2.0


Step 2: Create the PowerShell Attribute Store

Create the PowerShell Attribute store as a custom attribute store in AD FS.  In this example, I called it PshAttrStore.  The class name is Class1 (I know it’s lazy, but I literally just threw it together in a few minutes), so use the following string for the class name in the custom attribute store: PshAttrStore.Class1, PshAttrStore


Step 3: Set AD FS Account Permissions

Give the AD FS Service Account permissions to run the script.  I just added the AD FS Service Account to the local Administrators group on the AD FS server.  Ideally, you would want to take the time to figure out what permissions it actually needs in order to execute PowerShell scripts, but I didn’t take the time to do that.  If anyone figures it out, post it as a comment and I’ll update this post with the information.

Step 4: Create Your PowerShell Script

For this example, I’m going to use a script that takes in the name of a folder and returns the size of it as a claim.  When returning the data back to AD FS, you have to use the Write-Output command at the end of the script.  Here’s my example script:

## GetFolderSize.ps1

## -------------------

## A sample script to return the size of the folder passed into the

## script as an argument


## Get the name of the folder as the first argument in the script

$directory = $args[0];


## Get the combined size of all of the items in the folder

$size = Get-ChildItem $directory | Measure-Object -Property Length –Sum


## Calculate the size in MB and format the size to 2 decimal places

$displayedSize = "{0:N2}" -f ($size.sum / 1MB) + " MB"


## Return the size of the folder back to AD FS

Write-Output $displayedSize


Step 5: Create the Claim Rule

I’m going to use my GetFolderSize.ps1 script to get the size of the user’s home directory. To do this, I’ll need two claim rules:

  • Claim Rule 1: Get the path of the user’s home directory by querying the homeDirectory attribute in Active Directory
  • Claim Rule 2: Call the GetFolderSize.ps1 script and pass in the home directory path that I got in the first claim rule

Here is what the claim rules for this look like

Claim Rule 1: Get Home Directory Path

Claim Rule 2: Get Home Directory Size

Step 6: Testing It Out

To test this, I’m going to use ClaimGrabber, which is a tool that I wrote to assist in claim rule authoring.  I’m using a beta version of ClaimGrabber in this post, which I’ll finish writing and post shortly.

You’ll notice in the ClaimGrabber output (below) that we are passing the application a claim called http://eag.demo/directorySize with a value of 14.77 MB. This claim is what we got back from the PS1 script!

Other Uses and Feedback

I thought this was an interesting idea to try out and I’m rather surprised how well it worked.  The results are pretty quick – there’s no noticeable delay when the user logs in, but I’m only running a simple script. I could see scenarios where you might want to use this to run some complex scripts. There are a ton of scenarios that you could use this for. Here are some that I could think of off the top of my head:

  • An easy way to do custom attribute stores without having to write a compiled .NET DLL
  • Auto-provision user accounts based on the claims
  • Kick off a FIM sync script for on-demand provisioning
  • Log some data about the user to an alternate audit log

I’m really interested to hear some feedback on this – in particular:

  • Would something like this be useful to deploy in production?
  • What other scenarios / scripts could you use this for?


Introducing ClaimGrabber

Download ClaimGrabber Here

I’ve been working with AD FS for several years now and it’s become obvious that there are so many different scenarios and use cases for claims-based identity that it will rarely be a “point and click” deployment.  I’ve seen a need for multiple tools that can tremendously help in this space.  So, outside of my day job at Microsoft, I’ve been busy working on creating quite a few AD FS 2.0 tools. In this post, I want to introduce you to the first tool in this suite - ClaimGrabber.  Before reading on, please note that this is something that I created on my own time and is not supported nor endorsed by Microsoft.

Testing Claim Rules

Often times when deploying AD FS and configuring Relying Party trusts, you author claim rules, but don’t really have an effective way to test them. The Claims UI in AD FS will help somewhat, providing syntax checking for claim rules for instance. But how can you test the rule itself to ensure that the resultant claims are what you expect?  Sometimes, AD FS administrators will develop the claim rules in a separate lab environment and use a sample WIF application from the WIF SDK to test what claims are getting passed through. This has gotten the job done, but the process is laborious and you often don’t have access to the true source of the claim data in the lab environment.  Also, this only provides insight into the claims being passed for the sample app, not other existing apps that trust AD FS.

Claims for Existing Relying Parties

This process for existing applications is also somewhat painful. If you’re federating with SharePoint 2010, you’ll build some claims rules and then see if they work as expected by trying to browse to SharePoint and see what happens. This is an inefficient way to test claim rules because many applications will not readily tell you what claims it was given. Also, if there is a misconfiguration on the application’s side or if you are authoring claim rules for future use, you won’t have a way to test them with the application until the application is ready to receive them and use them.

The other method for testing claims passed to existing RP trusts is to use a web debugger, such as Fiddler. If your Relying Party isn’t an application, but rather another federation service, you might use Fiddler to catch the POST method while it’s being passed through your browser and then dissect the SAML token manually. If you’ve done this, you’ll know that it’s not a lot of fun weeding through a bunch of XML and trying to find a couple of claims.

How ClaimGrabber Helps

This is the reason that I created ClaimGrabber. ClaimGrabber is an application that you run directly on one of the AD FS 2.0 servers.  Basically, it impersonates both the user’s browser and application on the other end of the trust.  ClaimGrabber is really simple to use; it’s only 3 steps and there is nothing you have to install:

  1. Select the application that you want to impersonate by choosing the corresponding trust from the drop down list
  2. Enter the credentials of the user that you want to see the claims for
  3. Click the “Grab Claims!” button

ClaimGrabber will attempt to log on by passing the application’s URN into the wtrealm query string parameter of the AD FS logon page’s URI. When AD FS responds with the web form that is used for POSTing the SAML token to the application, ClaimGrabber grabs the response stream and extracts the SAML token rather than processing the javascript auto-submit function. The claims extracted from the token are then displayed in the claim list inside the ClaimGrabber tool.  Since the tool intercepts the POST-back, it doesn’t matter whether or not the application is actually accessible or even whether it’s a real application. Therefore, ClaimGrabber can be run against your existing list of RP trusts and show you what claim data is being sent to those RPs.

Requirements

Here are the requirements for running ClaimGrabber:

  • ClaimGrabber must be run directly on one of the AD FS 2.0 servers  
  • The user account that launches ClaimGrabber must be an AD FS administrator. Please note that this is different from the account that you are using to log on to the RP with. ClaimGrabber allows you to specify the user that you log on with in the UI.

Improvements

There are a couple of things that the tool doesn’t do, but are on my list for a future update:

  • Encrypted Tokens - Currently, ClaimGrabber cannot handle encrypted SAML tokens.  In a later revision, I’ll give you the option of passing in the RP application’s encryption certificate containing the private key and have ClaimGrabber decrypt the token.
  • Non-Active Directory Identity Providers - Right now, ClaimGrabber only authenticates users against the Active Directory claims provider. I plan on adding the capability to use other claims providers, including non-ADFS providers, in a future revision of the tool.

So download it, use it, and let me know if you come across any bugs or have suggestions for improvement. Feel free to comment on this blog post with them or send me an email at ken@identityguy.com.

Download ClaimGrabber Here

Adding Claims to an Existing Token Issuer in SharePoint 2010

One of the biggest frustrations that I found when working with SharePoint and ADFS integration was that after you create the Identity Provider trust in SharePoint, you can’t add any additional claims…  or so it seems.  So after being super frustrated with this limitation, I finally just said – there’s gotta be a better way.  Turns out that there is!

Before I go through this, I want to give a shout-out to Steve Peschka’s blog post on setting up the initial trust on the SharePoint side. Steve does a great job of giving us instructions for adding the identity provider trust into SharePoint. Here’s a link to that post: http://blogs.technet.com/b/speschka/archive/2010/02/17/creating-both-an-identity-and-role-claim-for-a-sharepoint-2010-claims-auth-application.aspx.

Adding a Claim Mapping

So what do you do if you’ve already created the trust and now you want to add additional claims to it? Here’s how to do it. In this example, I’m going to add the claim http://test/shoesize to identity provider trust called sts.contoso.com. Here’s the trust before the ShoeSize claim is added:

image

The first thing you need to do is stick your trust into an SPTrustedLoginProvider object:

PS C:\> $ti = Get-SPTrustedIdentityTokenIssuer sts.contoso.com

Second, you will need to add the claim type to the SPTrustedLoginProvider object and update it:

PS C:\> $ti.ClaimTypes.Add(“http://test/shoesize”)
PS C:\> $ti.Update()

Now, if you look at the trust after you add the claim type, you will see it added to the list of ClaimTypes:

image

Next, you can create the claim mapping:

PS C:\> $map3 = New-SPClaimTypeMapping –IncomingClaimType “http://test/shoesize” –IncomingClaimTypeDisplayName “ShoeSize” –SameAsIncoming

Finally, you will need to add the claim mapping to the trust:

PS C:\> Add-SPClaimTypeMapping –Identity $map3 –TrustedIdentityTokenIssuer $ti

Now you should be able to run Get-SPTrustedIdentityTokenIssuer and see your new claim mapping.

image

So now we can go into SharePoint and use the claim:

image

Removing the Claim Mapping

OK, so you know how to add claims, but what about removing them?  The process is actually the same in reverse.

First, you need to put the trust into an SPTrustedLoginProvider object, just like you did above:

PS C:\> $ti = Get-SPTrustedIdentityTokenIssuer sts.contoso.com

Next, you will need to put the claim mapping into an object. In this example, I’m going to use the same mapping that we just added, ShoeSize:

PS C:\> foreach ($c in $ti.ClaimTypeInformation) { if ($c.DisplayName –eq “ShoeSize”) { $mapping = $c; } }

What I’m doing here is enumerating through the list of claim mappings and looking for the one whose DisplayName is “ShoeSize”. When I find it, I’m putting it into a variable called $mapping.

Next, you can run the command to Remove the mapping from the trust:

PS C:\> Remove-SPClaimTypeMapping –Identity $mapping –TrustedIdentityTokenIssuer $ti

Now, your trust should have the mapping removed, however the claim type is still there:

image

So as a final step, we’ll need to remove the claim type from the list:

PS C:\> $ti.ClaimTypes.Remove(“http://test/shoesize”)
PS C:\> $ti.Update()

And that’s it – your claim mapping should be gone:

image

Federation Woes - ADFS v2 and Oracle

The other day, I was working on a proof of concept for a customer who wanted to do some identity federation testing between Oracle, IBM, and ADFS version 2. In this configuration, we were working with an architecture that resembled the following:

clip_image001[7]

Going into this, I thought this was a no-brainer - after all, ADFS v2 passed IdP Lite, SP Lite, and eGov SAML profile testing. The ADFS v2 configuration went smoothly. I got the metadata file from Oracle and imported with no issues. There were no problems whatsoever setting up the RP trust on my end. Here's a screen capture of my endpoint configuration:

clip_image002[5]

However, when it came time for Oracle to import the ADFS v2 metadata file, we ran into issues. When Oracle tried to import our FederationMetadata.xml file, they were getting the following error:

org.xml.sax.SAXException: Could not locate translation scheme associated with "http://docs.oasis-open.org/wsfed/federation/200706":ApplicationServiceType, child of "urn:oasis:names:tc:SAML:2.0:metadata"

As it turns out, the Oracle SP doesn't support harmonized data in the SAML metadata format. By default in ADFS v2, we expose both the SAML and WS-Federation endpoints in our FederationMetadata.xml file. In the screen capture below, you can see that the RoleDescriptor elements contain the data for our WS-Fed endpoints. The SAML 2.0 metadata spec does allow this. It’s defined in section 2.4.1 of the SAML Metadata 2.0 format specification.

clip_image003[6]

So I manually removed the RoleDescriptor elements and re-sent the FederationMetadata.xml file back over to Oracle. So now, the file only had the SPSSODescriptor and IDPSSODescriptor elements, which are used to define only the SAML endpoints. The below screen capture shows the edited file:

clip_image004

So I sent this file back to Oracle and voila… a different error:

javax.management.RuntimeMBeanException: javax.management.RuntimeMBeanException: The Signing Certificate could not be validated. Could not add metadata at weblogic.rmi.internal.ServerRequest.sendReceive(ServerRequest.java:205)

As anyone reading the above error would assume, I read this and thought they were having issues with our token signing cert. So I sent them over a copy of the .cer file and they imported it into their certificate store, but it still didn't work. I wasn't sure what else we could do on the Microsoft side, so I tabled this for a few days, waiting for Oracle to come up with an answer as to why they couldn't import the file.

A few days later, I was sitting at Panera Bread having lunch and working (as is my usual fare) when I suddenly realized that I never regenerated the signature on the metadata file! Doh! So after consulting with the trusty (pun intended) ADFS product group on the best way to regenerate that signature, I took their advice to try removing it altogether. I opened the FederationMetadata.xml file, deleted the signature element (the ds element) and sent it back over to my new buddy Matt at Oracle.

I tell you, I heard the church bells ringing that day - the file worked and the world gasped in silence for a nanosecond as Microsoft and Oracle came together in harmony. Here's a screen capture of the metadata file with the signature removed:

clip_image005

So here are the lessons learned when federating ADFS v2 with Oracle Identity Federation:

  • Don't use the FederationMetadata.xml file unless you want to modify it
  • If you do use the FederationMetadata.xml file, remove the WS-Fed RoleDescriptor elements and don't forget to remove or regenerate the signature on the file
  • Don't take java error messages at face value … I know, I know - we're guilty of that too, sometimes :)

I swear I could hear Laura Hunter across the US… "So it was both PKI AND a typo" Special thanks to Matt @ Oracle!