Since AD FS 2012 R2 came out, I’ve seen lots of folks complain about customization capabilities. Namely, that it’s less flexible than AD FS 2.x. This is true, since you can’t make server-side customizations like you could in the 2.x. However, I would argue that many of the things that need to be customized could be done via client-side customizations in JavaScript, which AD FS 2012 R2 does allow.
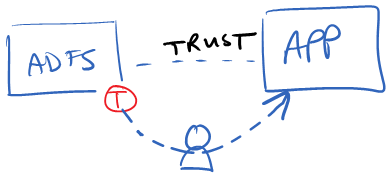
One such customization that I want to cover in this post is the ability to honor AD password expiration. If someone’s password is expired (or needs to be set on first login), the default behavior in AD FS is to give the user the following message:

What we’re going to do in this post is demonstrate how this default behavior can be changed, by redirecting the user to a custom “Change Password”. Keep in mind that while AD FS 2012 R2 does have a “Change Password” page built-in, it is only enabled for Workplace Joined devices. Because of this, we’re going to use a custom “Change Password” page in this example.
To achieve this, we’re going to use client-side JavaScript to detect when the password expiration message is given back to the user, change the message to tell the user that we’re redirecting them, and then do the redirect to the custom “Change Password” page.
Password Expiration Detection Script
The first thing we’re going to do is create the JavaScript code to detect whether AD FS gave the user a “password has expired” message instead of a successful sign-in. To do this, we need to examine the HTML element called “errorText”. This is the label that displays the “password has expired” message, as shown in the previous screen shot. We’re going to do a string comparison to determine if the “errorText” label starts with “Your password has expired.”, and wrap that in an “if” statement so we can do something as a result. (Note that I’m not doing a case-insensitive comparison in this example, so you have to make sure the casing is correct.)
Here’s the code that does this detection:
var custom_error = document.getElementById('errorText');
var custom_searchText = "Your password has expired.";
if (custom_error.innerText.substring(0, custom_searchText.length) == custom_searchText)
{
// Do something here…
}
Inside the “if” statement is where we are going to change the text that the user sees and put the code to redirect the user to the “Change Password” page.
To change the text of the “errorText” label, we’ll use the following code:
custom_error.innerText = "Your password has expired. Redirecting...";
And this code does the redirect:
document.location.href = ‘https://www.contoso.com/ChangePassword’;
Ok, now let’s take all of that JavaScript and put it together. We’re going to save the following JavaScript code in a new file called custom.js. In this example, I’m going to save it in the folder “C:\CustomADFS” on the AD FS server:
C:\CustomADFS\custom.js:
var custom_error = document.getElementById(‘errorText’);
var custom_searchText = “Your password has expired.”;
if (custom_error.innerText.substring(0, custom_searchText.length) == custom_searchText)
{
custom_error.innerText = “Your password has expired. Redirecting…”;
document.location.href = ‘https://www.contoso.com/ChangePassword’;
}
Add the Custom Script to AD FS
Now that we have a JavaScript file with our custom code, we need to make that code available to AD FS so it can provide it to the client. To do this, we’re going to create a new Web Theme in AD FS. Web Themes are basically a collection of resources that are used to change the look and feel of the AD FS web pages. You can list the themes by running the following PowerShell command:

You’ll notice that there is a default theme called “Default”. You can’t modify this theme, so what we have to do is make a copy of it. Do that, we’re going to run the following PowerShell command, which will copy the Default theme into a new theme called “Custom”.
New-AdfsWebTheme -Name Custom -SourceName Default

You’ll notice that when the theme is created, it’s set with the same values as the default theme. Now, AD FS is still set to use the default theme, so we have to tell AD FS to use our new “Custom” theme instead. Do that, run the following PowerShell command.
Set-AdfsWebConfig –ActiveThemeName Custom

The next step is to add our custom.js file into the theme. Before we do that, let’s take a look at the resources that the theme currently has. You can do this by looking at the AdditionalFileResources parameter on the theme.
(Get-AdfsWebTheme -Name Custom).AdditionalFileResources

So here we have a couple of images and another JS file already there (onload.js), which AD FS uses by default. To add our custom.js file to the list, we run the following command:
Set-AdfsWebTheme -TargetName Custom –AdditionalFileResource @{Uri="/adfs/portal/script/custom.js"; Path="c:\CustomADFS\custom.js"}

I’ll point out here that typically, when you specify a collection in a PowerShell script, it overwrites the entire attribute. This particular cmdlet, however, appends the entry to the end of the existing collection. When adding the resource, we need to specify both the URL that the resource can be accessed under, in addition to the name of the file that we’ll populate that resource with. Now that the resource is added to AD FS, the contents of the custom.js file on disk are not automatically updated. Every time you make an update to custom.js, you will need to re-run the Set-AdfsWebTheme command to re-import the changes into AD FS.
Inject the Script into the Sign In Page
We’re almost there. The last step is to inject the script into the Sign-In page so that AD FS provides it to the client for execution. There are a couple of ways to do this, but in this example, we’re going to inject it straight into the Sign In page, specifically, via the customizable description text. The reason I chose this route is so that the custom script is only injected into the sign-in page. I could also have added it to the onload.js script that AD FS already has, but in doing so, it would be injected into every page that AD FS returns.
To inject our script, we’re going to run the following PowerShell command:
Set-AdfsGlobalWebContent –SignInPageDescriptionText "<script type=""text/javascript"" src=""/adfs/portal/script/custom.js""></script>"

And that’s it – now, when users attempt to log in with an expired password, they are redirected to our custom “Change Password” page.
Final Thing… Redirecting Back
One other thing I should mention is that I did not cover the process of redirecting the user back to their original URL after changing their password. This is something you’ll probably want to do, so that the user doesn’t have to browse back to their application and re-initiate the login process. To do this, you’ll want to base64 encode the sign-in page URL and pass it to your custom “Change Password” page – either through a query string parameter, a cookie, or maybe through a POST method instead of a redirect.
Once the “Change Password” page has the original URL, it can just do a redirect back to that URL after the password is changed, taking the user back to the AD FS sign in page. From there, the user can log in with their new password and get a token for that application.


![clip_image001[7]](https://static1.squarespace.com/static/583aea9bbebafb65513389b1/t/583aebc95149bf554a72778d/1278095422257/WindowsLiveWriter-FederatingADFSv2andOracle_C2FF- "clip_image001[7]")
![clip_image002[5]](https://static1.squarespace.com/static/583aea9bbebafb65513389b1/t/583aebc95149bf554a72778f/1278095426693/WindowsLiveWriter-FederatingADFSv2andOracle_C2FF- "clip_image002[5]")
![clip_image003[6]](https://static1.squarespace.com/static/583aea9bbebafb65513389b1/t/583aebc95149bf554a727791/1278095433038/WindowsLiveWriter-FederatingADFSv2andOracle_C2FF- "clip_image003[6]")


![clip_image002[4]](https://static1.squarespace.com/static/583aea9bbebafb65513389b1/t/583aebc95149bf554a7277c9/1274754420083/WindowsLiveWriter-ManagedServiceAccounts_138D2- "clip_image002[4]")
![clip_image004[4]](https://static1.squarespace.com/static/583aea9bbebafb65513389b1/t/583aebc95149bf554a7277cb/1274754421333/WindowsLiveWriter-ManagedServiceAccounts_138D2- "clip_image004[4]")
![clip_image005[4]](https://static1.squarespace.com/static/583aea9bbebafb65513389b1/t/583aebc95149bf554a7277cd/1274754421997/WindowsLiveWriter-ManagedServiceAccounts_138D2- "clip_image005[4]")
![clip_image007[4]](https://static1.squarespace.com/static/583aea9bbebafb65513389b1/t/583aebc95149bf554a7277cf/1274754422937/WindowsLiveWriter-ManagedServiceAccounts_138D2- "clip_image007[4]")
![clip_image009[4]](https://static1.squarespace.com/static/583aea9bbebafb65513389b1/t/583aebc95149bf554a7277d1/1274754423727/WindowsLiveWriter-ManagedServiceAccounts_138D2- "clip_image009[4]")
![clip_image011[4]](https://static1.squarespace.com/static/583aea9bbebafb65513389b1/t/583aebc95149bf554a7277d3/1274754424022/WindowsLiveWriter-ManagedServiceAccounts_138D2- "clip_image011[4]")
![clip_image013[4]](https://static1.squarespace.com/static/583aea9bbebafb65513389b1/t/583aebc95149bf554a7277d5/1274754424713/WindowsLiveWriter-ManagedServiceAccounts_138D2- "clip_image013[4]")
![clip_image015[4]](https://static1.squarespace.com/static/583aea9bbebafb65513389b1/t/583aebc95149bf554a7277d7/1274754425073/WindowsLiveWriter-ManagedServiceAccounts_138D2- "clip_image015[4]")


