Handling Expired Passwords in AD FS 2012 R2

Since AD FS 2012 R2 came out, I’ve seen lots of folks complain about customization capabilities. Namely, that it’s less flexible than AD FS 2.x. This is true, since you can’t make server-side customizations like you could in the 2.x. However, I would argue that many of the things that need to be customized could be done via client-side customizations in JavaScript, which AD FS 2012 R2 does allow.

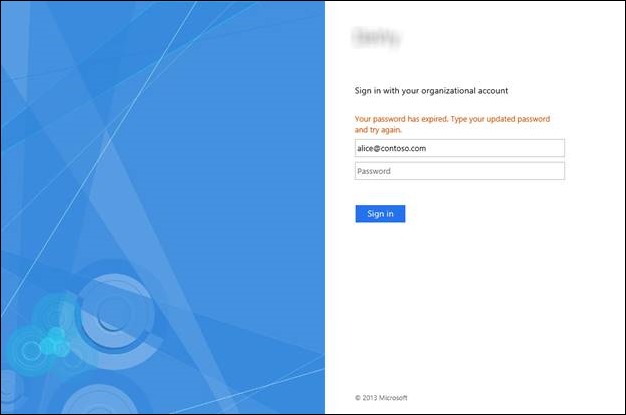
One such customization that I want to cover in this post is the ability to honor AD password expiration. If someone’s password is expired (or needs to be set on first login), the default behavior in AD FS is to give the user the following message:

clip_image002

What we’re going to do in this post is demonstrate how this default behavior can be changed, by redirecting the user to a custom “Change Password”. Keep in mind that while AD FS 2012 R2 does have a “Change Password” page built-in, it is only enabled for Workplace Joined devices. Because of this, we’re going to use a custom “Change Password” page in this example.

To achieve this, we’re going to use client-side JavaScript to detect when the password expiration message is given back to the user, change the message to tell the user that we’re redirecting them, and then do the redirect to the custom “Change Password” page.

Password Expiration Detection Script

The first thing we’re going to do is create the JavaScript code to detect whether AD FS gave the user a “password has expired” message instead of a successful sign-in. To do this, we need to examine the HTML element called “errorText”. This is the label that displays the “password has expired” message, as shown in the previous screen shot. We’re going to do a string comparison to determine if the “errorText” label starts with “Your password has expired.”, and wrap that in an “if” statement so we can do something as a result. (Note that I’m not doing a case-insensitive comparison in this example, so you have to make sure the casing is correct.)

Here’s the code that does this detection:

var custom_error = document.getElementById('errorText');
var custom_searchText = "Your password has expired.";
if (custom_error.innerText.substring(0, custom_searchText.length) == custom_searchText)
{
    // Do something here…
}

Inside the “if” statement is where we are going to change the text that the user sees and put the code to redirect the user to the “Change Password” page.

To change the text of the “errorText” label, we’ll use the following code:

custom_error.innerText = "Your password has expired. Redirecting...";

And this code does the redirect:

document.location.href = ‘https://www.contoso.com/ChangePassword’;

Ok, now let’s take all of that JavaScript and put it together. We’re going to save the following JavaScript code in a new file called custom.js. In this example, I’m going to save it in the folder “C:\CustomADFS” on the AD FS server:

C:\CustomADFS\custom.js:

var custom_error = document.getElementById(‘errorText’);
var custom_searchText = “Your password has expired.”;
if (custom_error.innerText.substring(0, custom_searchText.length) == custom_searchText)
{
    custom_error.innerText = “Your password has expired. Redirecting…”;
    document.location.href = ‘https://www.contoso.com/ChangePassword’;
}

Add the Custom Script to AD FS

Now that we have a JavaScript file with our custom code, we need to make that code available to AD FS so it can provide it to the client. To do this, we’re going to create a new Web Theme in AD FS. Web Themes are basically a collection of resources that are used to change the look and feel of the AD FS web pages. You can list the themes by running the following PowerShell command:

clip_image004

You’ll notice that there is a default theme called “Default”. You can’t modify this theme, so what we have to do is make a copy of it. Do that, we’re going to run the following PowerShell command, which will copy the Default theme into a new theme called “Custom”.

New-AdfsWebTheme -Name Custom -SourceName Default

clip_image006

You’ll notice that when the theme is created, it’s set with the same values as the default theme. Now, AD FS is still set to use the default theme, so we have to tell AD FS to use our new “Custom” theme instead. Do that, run the following PowerShell command.

Set-AdfsWebConfig –ActiveThemeName Custom

clip_image008

The next step is to add our custom.js file into the theme. Before we do that, let’s take a look at the resources that the theme currently has. You can do this by looking at the AdditionalFileResources parameter on the theme.

(Get-AdfsWebTheme -Name Custom).AdditionalFileResources

clip_image010

So here we have a couple of images and another JS file already there (onload.js), which AD FS uses by default. To add our custom.js file to the list, we run the following command:

Set-AdfsWebTheme -TargetName Custom –AdditionalFileResource @{Uri="/adfs/portal/script/custom.js"; Path="c:\CustomADFS\custom.js"}

clip_image012

I’ll point out here that typically, when you specify a collection in a PowerShell script, it overwrites the entire attribute. This particular cmdlet, however, appends the entry to the end of the existing collection. When adding the resource, we need to specify both the URL that the resource can be accessed under, in addition to the name of the file that we’ll populate that resource with. Now that the resource is added to AD FS, the contents of the custom.js file on disk are not automatically updated. Every time you make an update to custom.js, you will need to re-run the Set-AdfsWebTheme command to re-import the changes into AD FS.

Inject the Script into the Sign In Page

We’re almost there. The last step is to inject the script into the Sign-In page so that AD FS provides it to the client for execution. There are a couple of ways to do this, but in this example, we’re going to inject it straight into the Sign In page, specifically, via the customizable description text. The reason I chose this route is so that the custom script is only injected into the sign-in page. I could also have added it to the onload.js script that AD FS already has, but in doing so, it would be injected into every page that AD FS returns.

To inject our script, we’re going to run the following PowerShell command:

Set-AdfsGlobalWebContent –SignInPageDescriptionText "<script type=""text/javascript"" src=""/adfs/portal/script/custom.js""></script>"

clip_image014

And that’s it – now, when users attempt to log in with an expired password, they are redirected to our custom “Change Password” page.

Final Thing… Redirecting Back

One other thing I should mention is that I did not cover the process of redirecting the user back to their original URL after changing their password. This is something you’ll probably want to do, so that the user doesn’t have to browse back to their application and re-initiate the login process. To do this, you’ll want to base64 encode the sign-in page URL and pass it to your custom “Change Password” page – either through a query string parameter, a cookie, or maybe through a POST method instead of a redirect.

Once the “Change Password” page has the original URL, it can just do a redirect back to that URL after the password is changed, taking the user back to the AD FS sign in page. From there, the user can log in with their new password and get a token for that application.
Email <> Identity Service

A couple of months ago, Yahoo announced its intentions to recycle email addresses that have been dormant for the year. There’s been some discussion about this in the security communities because the implications of this could be bad.  This would allow the new owner of an email address to hijack identities at web sites that the previous owner used.

The core problem in all of this is that email is being used as an identity verification mechanism through “ownership-based” identity proofing. Many sites make the assumption that if the person can receive email at a particular email address, then they own that address.  Based on that assumption, many web sites are ok with allowing a user’s password to be reset over email. This is a faulty assumption for a couple of reasons:

  1. Some people share a single email address among many family members. I know a few families that have a single email address that each family member shares. The idea of this is noble – that there’s nothing to hide.  In practice, however, it does weaken the security of the family member’s identities on the Internet.
  2. There’s nothing to stop an email address from being transferred to a new owner.  I don’t think many us would even consider this scenario, because we just wouldn’t think that a large email provider would consider recycling email addresses. Since Yahoo is moving in this direction, this is going to be a real issue that we’re going to have to deal with. This becomes particularly problematic for my clients that are thinking of using identities asserted from social identity providers (such as Yahoo).
  3. You’re relying on the security of the email provider to prevent that email address from being stolen.  You’re only as secure as the weakest link in the identity chain. If a web site uses a strong password, but allows the password to be reset over email that is hosted by a provider that does not enforce a strong password, then that effectively reduces the security of web site for that user.

Email is great as a notification or message delivery mechanism, but it’s an awful identity service and shouldn’t be used that way.


A Look at Azure AD’s Web Sign-In Endpoints

If you’ve played with Azure AD at all, one thing you may have noticed is that there is this concept of “Azure AD Integrated Applications”.  You can create an “Integrated Application” in Azure AD and the application gets its own object representation in the directory. You can then manage the various settings related to how the application interacts with Azure AD, such as configuring federated authentication or directory access. In this post, I’m going to take a look at Azure AD endpoints that are related to Web Sign-In, with Azure AD acting as an IdentityProvider for an application.

One misconception that some folks may have is that Azure AD is a cloud identity service that can only be used for Azure applications.  This is far from the truth.  In fact, you can federate both custom and commercial on-premises applications with Azure AD, as well as applications from well-known Internet Service Providers.  In doing so, your Azure AD tenant acts as the Identity Provider STS for the application by providing a couple of different endpoints that the application can use (Note: The OAuth and Graph endpoints in Azure AD are not used for Web Sign-In, so I won’t be covering them in this post):


Your user principals could be synchronized from your on-premises directory to Azure AD via DirSync, or they could exist solely in Azure AD. Either way, when Azure AD is your identity provider, your application requests a token from one of the Azure AD Web Sign-In endpoints and your users authenticate with Azure AD directly. There are a number of endpoints available for your on-premises applications to use, including the WS-Federation and SAML-P endpoints to use for web sign in. Here is a screen shot of the endpoints available in one my current Azure AD tenants.


As I mentioned earlier, I’m going to ignore the Graph API and OAuth 2.0 endpoints for now and I’ll cover those in a later post.  The other 4 are the ones that are important for allowing your users to use Azure AD for web sign in to an application.
Federation Metadata

The Federation Metadata endpoint is your standard endpoint for auto-configuring the federation trust at the Relying Party. Similar to AD FS, Azure AD exposes the RoleDescriptor elements for WS-Federation and WS-Trust, in addition to the IDPSSODescriptor element for SAML-P 2.0.  One difference that you may notice from AD FS is that there’s no SPSSODescriptor element. This is because Azure AD is always acting as an Identity Provider STS, and not a Relying Party STS.

One thing to keep in mind is that when federating some non-Microsoft Relying Parties, you may have to save off a copy of the Federation Metadata file and edit it to remove the RoleDescriptor elements and the XML signature.  Some 3rd party applications (such as WebLogic) don’t properly ignore the RoleDescriptors and will therefore not import the metadata file when configuring the trust.  The reason you have to remove the XML signature also is because the signature is broken when you remove the RoleDescriptor elements.  If you leave the existing signature in place, the Relying Party won’t import it because of the signature mismatch. By removing the signature, you remove the signing check.  You are also removing a vital piece of security, by the way. Although, in this case we’re giving the RP a local copy of the file, so the lack of a signature is less of a concern since there’s no notion of a Man in the Middle attack.

WS-Federation

The WS-Federation endpoint is the standard WS-Federation 1.2 protocol. When minting tokens from this endpoint, Azure AD uses the SAML 2.0 format:

This means that if you have an application that uses a SAML 1.1 security token handler, you cannot establish a direct trust with Azure AD.  If you need to have the STS for a SAML 1.1 over WS-Fed RP in the cloud, then you’re going to want to use an Access Control Service (ACS) instance to transition the SAML 2.0 token format to a SAML 1.1 token format.  One such example is in SharePoint 2010/2013 running in claims mode.  The screen shot below is from the web.config file on SharePoint 2013.  You’ll see where I’ve pointed out that SharePoint is using a SAML 1.1 token handler.  Because of this, if you federate SharePoint 2010/2013 with Azure AD directly, you get an error that says that it doesn’t know how to handle the SAML 2.0 assertion type.


So if your COTS applications use WIF and only support a SAML 1.1 token handler, then you’ll need the following architecture:


SAML-P

The SAML-P endpoints are for minting SAML 2.0 tokens over the SAML 2.0 protocol.  Here we have 2 endpoints – one for sign in and one for sign out.  When submitting an AuthnRequest to the SAML-P sign in endpoint, the request cannot be signed, as Azure AD does not support SAML authentication request signing. However, when submitting a LogoutRequest to the sign out endpoint, that request does need to be signed.  So in order for Azure AD to verify the signature, it has to have a copy of the public key that the Service Provider is using to sign the request with.  Now, you’ve probably noticed that there is no place in your published application in Azure AD to upload a certificate.  Instead, Azure AD only supports electronic transference of this certificate through a metadata endpoint on the Service Provider.  This is configured in the Single Sign On settings section of the published application configuration in Azure AD:


It’s not uncommon for SAML 2.0 Service Providers to have a metadata document at this endpoint that contains the signing key, but not all Service Providers have this. So if you don’t have a metadata endpoint with the public key included, and you want to use the sign-out endpoint, then you have to put in a support ticket so you can transfer that public key to us out of band.

Also, it’s important to note that your WIF-based applications will not be able to use these SAML-P endpoints. WIF does not natively support the SAML 2.0 protocol, only the WS-Federation protocol with SAML 1.1/2.0 assertions. However, a couple of years ago, we released a CTP for SAML 2.0 protocol support for WIF, though it was never released outside of CTP.  So more than likely you would be using these endpoints with your non-Microsoft applications, such as Java-based apps running on WebLogic or using something like the Oracle OpenSSO fedlet.

Location-Agnostic Applications

So because Azure AD uses the approach of publishing multiple endpoints that are available both in the Azure cloud and outside of the Azure cloud, Azure AD doesn’t really care where the application lives.  Applications that are on-premises, hosted in 3rd party Service Providers, or hosted in the Azure cloud can all take advantage of web sign in through Azure AD.  You just need to make sure that the application uses the appropriate endpoint, and also that it uses the endpoint properly.

I’ll be posting more in the future as I run through a few more scenarios that I’m working with, so keep an eye out for more coming down the pipe.


Identity-Based Decisions

I thought I'd follow-up on my post from this weekend and add some additional context around the need for strong proofing across the Internet as a precursor to an AzaaS model.   There is a very valid question that we all must ask - who do you think you are?  Without some form of strong identity proofing, your reputation is what defines you.  Unless there is a trusted 3rd party to vouch for you, then your identity is self-asserted.  Back in the day, the "my word is my bond" technique for trust was acceptable, but not so much today.

So what? For low value transactions, this is just fine.  At the end of the day, it doesn't matter if your Facebook profile is a real person. For higher value transactions, however, this is extremely important.  This is particularly true for the enterprise, where relationships with businesses, organizations, and consumers is the lifeblood of the organization. After all, the Service Providers need to make decisions based on the identities using the service. And if the identity is inaccurate, it's going to be a poor decision. When my supplier accesses my invoicing system, I really want to make sure that the person logging in is from the supplier.  If I'm buying a car and completing a title transfer online, I want to make certain that the person I'm giving my money to really owns the car.  This applies to virtually every area of online services - businesses, government, health care, etc...

Wouldn't it be interesting to imagine an online world where every identity is proofed to some level, and the level of that proofing follows the identity from place to place?  Would Service Providers make different decisions?  I think they would.  If you proved your digital identity in-person at, say, your local DMV and they gave you a strong credential to assert this proof, I'd be much more comfortable buying your car online. 

Authorization decisions are just another type of decision that a Service Provider must make about how someone uses their service. In order for us to starting thinking about a Trust Framework model to authorization across the Internet, the proofing problem needs to be solved. And there are, unfortunately, more questions than there are answers.  There are some consumer-based solutions out there now (the Symantec/Experian solution, for example), but we've got to break out of the bounds of the enterprise and make identity proofing available to the general public in wide-spread form.  NSTIC is laying these foundations, and I believe a hybrid public/private approach is the right approach - as long as the privacy-enhacing technology is in place as an identity mediator.

Authorization as a Service (AzaaS)

The other day, I stumbled upon a ZDNet blog post from 2006 - called "Identity Management as a Service".  Back then, and even now, we all had the "as a Service" bug - turning everything we can into a web service of some sort and tacking an "aaS" at the end.  The idea of IdMaaS is being thoughfully pursued, with folks such as our own Kim Cameron getting involved in the discussion.

The author of the aforementioned blog, Eric Norin, asserts that SalesForce.com may be a potential IdMaaS provider. Back in 2006, this would have made sense - identity was very much trust-driven model and organizations only wanted to deal with trusted entities.  While there is a great need for trusted identities, I think a lot of folks have realized that untrusted identities are still valuable, up to a certain extent. Rather than seeing SalesForce.com come to the table as a trusted identity provider, we've seen providers like Facebook and Twitter crop up and offer "less trusted" identities. "Social Identity Providers" have become the norm, and people just inherently understand and accept the fact that there's a chance the person sitting behind the keyboard is not who they claim to be.

To overcome this, the consumers of these identities (the Service Providers) have to put their own identity proofing mechanisms in place.  You can log into a web site with your Facebook account and the Service Provider doesn't really care if your identity has been proofed. However, when it comes time to pay for something, then the SP cares a lot because their business model is dependent on valid, legal transactions. The higher value the transaction, the more important the proofing. With initiatives like NSTIC calling for safe and private identity usage online, it's vitally important that we solve this high assurance identity problem. By the way, did you notice that Microsoft is involved in one of the NSTIC pilots? :)

So while social identity providers are great for providing identities with a low level of assurance, I don't think we'll see truly effective IdMaaS until providers adopt strong proofing mechanisms and we have a well-adopted, trusted exchange for "high assurance" identities.

However, hidden among all of this is an even greater need.  I've felt for quite some time that we all spend too much time talking about "Identity" Management and not enough time talking about "Access" Management.  After all, identity is a 4-legged stool (Administration, Authentication, Authorization, and Auditing), and we focus a lot on the first two legs (Administration and Authentication). We can have the most thoughtful and well-adopted IdMaaS service in place, but unless we get to a universally accepted authorization model, we're missing a large part of the identity puzzle. So I'm going to join in on the "aaS" fad and suggest that we start thinking about "Authorization as a Service" now before we get to the point where we wish we had thought about it sooner.

Kerberos in Multi-Tier Applications - Part 1 - Properly Configuring SPNs

Understanding how to correctly configure Kerberos in multi-tier applications, such as FIM, seems to be an elusive skill in not only identity folks, but even in well-seasoned IT people.  Even the most well-known and respected people get it wrong. It’s a very confusing topic. When I explain this to someone, it sometimes takes multiple conversations with the same person to help them understand it. Nothing to do with the person’s technical skills – it’s just a really complex topic if you’re not used to working with it.  To make this a little more digestible, I’m going to split this discussion into two posts.

In this first post, I’m going to explain why a Service Principal Name (SPN) is important and how to properly set one.

A Little Background on Kerberos

Before we can look at what an SPN is, you first have to have a decent understand of the basics of Kerberos.  In a nutshell, this is how it works – when a client (a user on a Windows 7 workstation, for example) wants to authenticate and use a resource on the network (such as a file share on a file server), the client gives the server a Kerberos ticket, which provides proof of the client’s identity.

To get a ticket, the client goes to a Key Distribution Center (such as a Domain Controller) and asks for one. The KDC will create a ticket and put some information inside. Here is some of the information in the ticket:

  • Principal of the user
  • Principal of the service hosting the resource
  • Timestamp indicating the date and time that the ticket becomes valid
  • Lifetime of the ticket
  • Session key that the client and server can use to establish an encrypted connection with

This ticket is encrypted with a shared secret that only the KDC and the Server hosting the resource knows. The KDC gives the ticket to the user, along with a copy of a session key, which both the user and the Server will know.  The user, in turn, gives the ticket to the Server and also sends the Server some data along with it (the user principal and timestamp – also known as the Authenticator), which is encrypted with the session key.

The Server decrypts the ticket with its copy of the secret (the one that is known only by the Server and the KDC) and it extracts the session key (the same one that the user got a copy of from the KDC) from the ticket. The Server can then use that session key to decrypt the Authenticator that the user sent over to it. If the Server can successfully decrypt the Authenticator, it knows that the user’s identity was verified by the KDC.

So, let’s recap on what happened in english, using the example of a user accessing a file share on a Windows Server:

  1. The user decides that he wants to connect to the file share
  2. The user goes to the Domain Controller (KDC) and says – “Hey, Mr. DC, I need a Kerberos ticket for this here file share so I can prove my identity to it”
  3. The DC says – “Sure, let me build a session key for you guys to talk securely with”
  4. The DC then looks in its database (Active Directory) and looks up the account that the file server is running under (the computer account of the server)
  5. The DC uses the secret in the computer account to encrypt the ticket it creates
  6. The DC sends the ticket and the session key back to the client
  7. The client sends the ticket and the encrypted Authenticator to the file server and says “Here you go – here’s proof of my identity and here’s the ticket to verify it”
  8. The file server decrypts the ticket, extracts the session key, and uses it to decrypt the Authenticator
  9. The file server says “OK, you’re good to go – here’s the data you want”

Where’s the SPN Used?

So now you might be asking – “what does this have to do with SPNs?”  A lot, actually. The key piece that SPNs are needed for are in step #4 of what I described above. In order for the DC to give a client a session ticket, it needs to know who the ticket is for and what secret to encrypt it with. And that’s where the SPN comes into play.

The SPN is all about helping the DC figure out which account to encrypt the session ticket for. Let’s look at it another way… let’s say that the situation is a user connecting to a SharePoint web site with Internet Explorer and trying to authenticate with Kerberos. In this case, the user goes to the DC and says – “Hey, Mr. DC, I need a Kerberos ticket for sharepoint.contoso.com.”   This should start making more sense about now…

You see, the web browser can’t ask for a Kerberos ticket for the server named CONTOSO-SHR01 because it has no idea what the name of the server is. The only thing the client knows to tell the DC is – “give me a ticket for sharepoint.contoso.com”. The DC has to figure out which account sharepoint.contoso.com is running under.  And the way it does this is by looking in Active Directory and finding the account that has the servicePrincipalName (SPN) attribute that matches sharepoint.contoso.com. Once the DC finds the account that the sharepoint.contoso.com web site is running under, it knows what secret to use to encrypt the session ticket.

Now you should also understand why duplicate SPNs are a problem. If more than one account has the same SPN, then the Domain Controller gets confused because it doesn’t know which account to encrypt the Kerberos ticket for.

What Does an SPN Look Like

As I just mentioned, SPNs are configured on the servicePrincipalName attribute of security principals in Active Directory – this applies to both user accounts and computer accounts. The servicePrincipalName attribute is a multi-valued attribute, because a security principal can have multiple SPNs. This makes sense, as a single account might host more than one service.

The actual SPN itself is presented in the format of: Service/Hostname

This is important because it adheres to the Kerberos v5 standards for service principals. Here are a couple of examples:

Service

Host Name

SPN

Web Site

www.contoso.com

HTTP/www.contoso.com

SQL

sqlserver1.fabrikam.com

MSSQLSvc/sqlserver1.fabrikam.com

File Share

fileserver03

HOST/fileserver03


You may have noticed that in the “File Share” example, the SPN uses HOST as the Service portion of the name. The HOST service is a generic representation of any service that runs under the context of the server’s security principal. In general, these are services that are provided by the Operating System. The computer account in Active Directory owns the HOST SPN. In the following screen shot, you’ll notice that this particular server (CONTOSO-WEB1) owns the SPNs for both the NetBIOS name and the FQDN, since a client could potentially use either SPN when getting a Kerberos ticket for the server – it entirely depends on how the client application that is requesting the Kerberos ticket works.

Setting a Proper SPN

So to recap – here are the rules to follow if you want to properly set an SPN.

  • The SPN must be in the format of Service/Hostname
  • The SPN for a service can only be attached to one account
  • The account that has the SPN has to be the account that receives the Kerberos ticket – this may be either a dedicated user account (also known as a Service Account)  or the computer account that belongs to the server
  • An account can have as many SPNs as you want
  • Use the HOST SPN for services that are running under the principal of the server’s computer account in Active Directory

So if you’re running SharePoint under a dedicated service account named CONTOSO\svc-sharepoint then the svc-sharepoint account in Active Directory needs to have the following entry in the servicePrincipalName attribute: HTTP/sharepoint.contoso.com.  It needs this so the Domain Controller knows which account to get the Kerberos ticket for when a user tries to connect to the SharePoint site.

SSO with SharePoint & Office Integration

Now,  I'm not a SharePoint person, but as an identity guy I've been forced to learn as much as SharePoint authentication as possible over the past several months.  I've been having one discussion in particular a LOT. This discussion revolves around why Single Sign On doesn't work well between SharePoint and Office integration. So I'm going to take some time, here, and explain what's happening.

The issue revolves around the Office client using a different cookie store than 3rd party web browsers use.  There are two ways to achieve SSO between SharePoint and Office – using either cookies or automated 401 response (integrated authentication)

Cookies for Authentication

The issue with the cookie-based approach really has more to do with Office than anything else. Office on Windows uses the wininet cookie jar. So when Office contacts a SharePoint site to open a document, it looks in wininet to find the cookie to use for SSO.  Internet Explorer also uses wininet. So if the user logs into the SharePoint site with IE, IE will put the SSO cookie into wininet. Then, when the user opens Office, Office uses that cookie that IE already put there.

Other web browser, however, use their own cookie jars. So if a user browses to SharePoint with, say Firefox, then Firefox will not put a cookie in the wininet cookie jar. When that same user opens Office, Office will see that there is no cookie for that SharePoint site there, and will undergo the typical authentication sequence in SharePoint (described in the next paragraph).  This is a similar experience for people who use Mac. Office on Mac doesn’t see the SSO cookie and undergoes the typical SharePoint authentication sequence.

Authentication without Cookies

When there’s no cookie, typical SharePoint authentication occurs. Depending on how SharePoint is configured for authentication, it will either respond with a 302 redirect (when configured with Forms Authentication) or a direct 401 response (when configured with Integrated Authentication).  If SharePoint is configured with Forms Authentication, SharePoint issues the 302 response back to the browser, which redirects the browser (or Office) to the logon page. Once this happens, the logon page UI is sent to the client over a 200 response. Therefore, the only way to achieve SSO with Forms Authentication is through the use of a cookie.  If, however, SharePoint is configured with Integrated Authentication, it will respond to the user’s request with a 401. One of two things will happen in the browser (or in Office):

  1. If the browser is configured to auto-respond to the 401 with a Kerberos ticket or NTLM token then the browser will send back the credentials and the user will have a Single Sign On experience
  2. If the browser cannot automatically respond to the 401, it will prompt the user with the typical, non-descriptive 401 dialog, asking the user for credentials

SSO Regardless of Cookies

Office uses the same API as Internet Explorer. So if all of the following conditions are met, the user will experience SSO regardless of the cookie situation, because Office will auto-respond to the 401 from SharePoint:

  • Integrated Authentication is enabled in Internet Explorer
  • The URL of SharePoint is added to the Intranet zone in IE
  • The user is logged into a domain-joined computer with their domain credentials

Sample Scenario

So let’s look at a scenario – how about a user logged into a domain-joined Windows computer and using Firefox.  Assuming that the above conditions are met for SSO –

  • When the user browses to SharePoint in Firefox, SP will issue a 401. Firefox will not be able to respond to the 401 automatically (unless you are using a plug-in that does it for you), so the user will be prompted with that familiar 401 dialog.
  • When the user opens up an Office document, Office will not send SharePoint a cookie (because Firefox can’t put a cookie in the wininet cookie jar), so SharePoint will respond to the request with another 401. But since the SSO conditions in the previous paragraph are met, Office will auto-respond to the 401 with either a Kerberos ticket or an NTLM credential and the user will experience SSO to Office.

Clarifying the Relationship Between SharePoint 2010 and AD FS 2.0

I was teaching an AD FS class internally here at Microsoft a few weeks ago, and during the class I covered SharePoint  2010 integration with AD FS. While there are lots of great materials out there that talk about the technical aspects of  how to set up the trust and send claims, there isn't much that really clarifies the concepts. So I just want to take a few  minutes and describe what happens conceptually, as it impacts your deployment and configuration of claims-based  SharePoint.

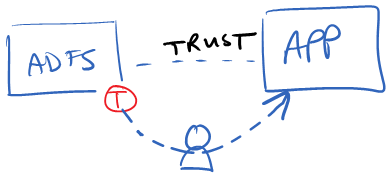
When a trust is established between AD FS and a typical (if there is such a thing) claims based application, the  application will accept the token from AD FS, verify it's signature, extract the claims, and use them.  A typical trust looks  something like this:

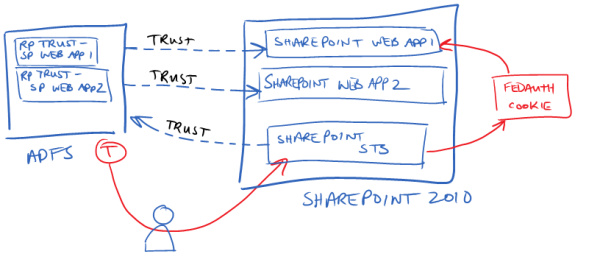
But the trust between AD FS and SharePoint, really looks something more like this:


Here, we have 2 different web apps in SharePoint, and therefore there are two different trusts from the perspective of the AD FS server. AD FS is going to create a unique token for each web app with different claims in each. However, the web apps themselves don't trust the tokens that AD FS sends to them. Instead, the SharePoint STS is what trusts the tokens that AD FS sends. Or to rephrase it another way, AD FS thinks that it is sending tokens to 2 different applications, but in reality it's not sending the tokens to either - it's sending them to the SharePoint STS.

The 3rd trust (the one that points from the SharePoint STS to the AD FS server) is the SPTrustedIdentityTokenIssuer object that you create in SharePoint. This type of design has some interesting side-effects. First, SharePoint can only have one SPTrustedIdentityTokenIssuer object for an AD FS server. Therefore, if you want different claims for each web app, you need to define the aggregate set of those claims on the SPTrustedIdentityTokenIssuer. To clarify, let's say that I want an "EmailAddress" claim in WebApp1 and an "Role" claim in WebApp2. The SPTrustedIdentityTokenIssuer object has to be configured with at least 2 claim mappings - one for "EmailAddress" and another for "Role". However, neither application is using both of them.

One of the interesting outcomes of this model is that from the application's viewpoint, there is a "pool of claims available" from the AD FS STS. Every application sees the same "pool of claims". However, if AD FS doesn't send that claim over for that particular web app, then the web app won't receive it even if it's expecting it. To visual this - imagine that I'm a user in WebApp1 and I'm defining a permission on a document library. As shown in the following image, I have 3 claims available. These are the same claims that every application sees, because it's "pool of claims" defined as "Claim Mappings" on the SPTrustedIdentityTokenIssuer object in SharePoint.

However, my Relying Party trusts in AD FS may not be configured to send all three claims for every application. So even though the end user may think that all of these claims are available for them to use, they may not be. This can be very confusing to the user - and is one of the reasons why you need to use a custom claims provider in almost every claims-based SharePoint 2010 deployment.

The FedAuth cookie box on the right of second diagam is another interesting quirk of how this trust works. In SharePoint, the STS does not send a SAML token to the web app. Instead, the STS creates the FedAuth cookie (a standard cookie used in WIF for the identity session state) which has an encrypted copy of the SessionSecurityToken object. This is the .NET object that is created by WIF after the SAML token is received, verified, and the claims are pulled out of it. So after the token is POSTed from AD FS back to the SharePoint STS, the SharePoint STS creates the FedAuth cookie and then issues a 302 redirect back to the user, which redirects the user to the original web app with their FedAuth cookie in hand. The SharePoint web app receives the cookie when the user request comes back to it and it uses WIF to extract the SessionSecurityToken object from the cookie and goes through the process of converting the identity into something that SharePoint can use internally.

So the relationship between AD FS and SharePoint is quite a bit different than other applications. If you can understand how this works, it will help you make better decisions about how to design your claims architecture in SharePoint.

PowerShell Attribute Store for AD FS 2.0

*WARNING: Academic exercise only – I’m not sure how this would scale in production*

Download the PowerShell Attribute Store

So I was at an event last week and a buddy of mine told me that he had an intern create an attribute store for AD FS that would provision an AD account if one didn’t exist. I got to thinking about this, and I thought why stop at provisioning accounts?  Why not have an attribute store that you can use to call any PowerShell script that you want and return the results as strings that you can use in claims.

So I went back and wrote it up and decided to share it with everyone. Feel free to download the attribute store and try it out.  It’s really simple – here’s how it works:

  1. Create the PowerShell Attribute Store in AD FS
  2. Create the PowerShell script.  In the script, pass the string that you want to give back to AD FS with the Write-Output cmdlet
  3. Create a claim rule that calls the attribute stor. Pass in a query string in the following format:

FULL_PATH_OF_SCRIPT;SCRIPT_PARAMETERS

I’ll illustrate how to use the PowerShell Attribute Store with an example. In this example, I’m going to get the size of the user’s home directory as a claim.

Example: Getting the User’s Home Directory Size as a Claim

Step 1: Install the PowerShell Attribute Store DLL

Download the PowerShell Attribute Store and copy the file PshAttrStore.dll into your AD FS installation folder. For example, C:\Program Files\Active Directory Federation Services 2.0


Step 2: Create the PowerShell Attribute Store

Create the PowerShell Attribute store as a custom attribute store in AD FS.  In this example, I called it PshAttrStore.  The class name is Class1 (I know it’s lazy, but I literally just threw it together in a few minutes), so use the following string for the class name in the custom attribute store: PshAttrStore.Class1, PshAttrStore


Step 3: Set AD FS Account Permissions

Give the AD FS Service Account permissions to run the script.  I just added the AD FS Service Account to the local Administrators group on the AD FS server.  Ideally, you would want to take the time to figure out what permissions it actually needs in order to execute PowerShell scripts, but I didn’t take the time to do that.  If anyone figures it out, post it as a comment and I’ll update this post with the information.

Step 4: Create Your PowerShell Script

For this example, I’m going to use a script that takes in the name of a folder and returns the size of it as a claim.  When returning the data back to AD FS, you have to use the Write-Output command at the end of the script.  Here’s my example script:

## GetFolderSize.ps1

## -------------------

## A sample script to return the size of the folder passed into the

## script as an argument


## Get the name of the folder as the first argument in the script

$directory = $args[0];


## Get the combined size of all of the items in the folder

$size = Get-ChildItem $directory | Measure-Object -Property Length –Sum


## Calculate the size in MB and format the size to 2 decimal places

$displayedSize = "{0:N2}" -f ($size.sum / 1MB) + " MB"


## Return the size of the folder back to AD FS

Write-Output $displayedSize


Step 5: Create the Claim Rule

I’m going to use my GetFolderSize.ps1 script to get the size of the user’s home directory. To do this, I’ll need two claim rules:

  • Claim Rule 1: Get the path of the user’s home directory by querying the homeDirectory attribute in Active Directory
  • Claim Rule 2: Call the GetFolderSize.ps1 script and pass in the home directory path that I got in the first claim rule

Here is what the claim rules for this look like

Claim Rule 1: Get Home Directory Path

Claim Rule 2: Get Home Directory Size

Step 6: Testing It Out

To test this, I’m going to use ClaimGrabber, which is a tool that I wrote to assist in claim rule authoring.  I’m using a beta version of ClaimGrabber in this post, which I’ll finish writing and post shortly.

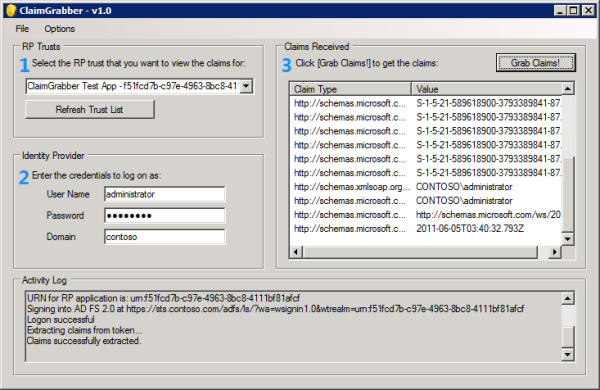
You’ll notice in the ClaimGrabber output (below) that we are passing the application a claim called http://eag.demo/directorySize with a value of 14.77 MB. This claim is what we got back from the PS1 script!

Other Uses and Feedback

I thought this was an interesting idea to try out and I’m rather surprised how well it worked.  The results are pretty quick – there’s no noticeable delay when the user logs in, but I’m only running a simple script. I could see scenarios where you might want to use this to run some complex scripts. There are a ton of scenarios that you could use this for. Here are some that I could think of off the top of my head:

  • An easy way to do custom attribute stores without having to write a compiled .NET DLL
  • Auto-provision user accounts based on the claims
  • Kick off a FIM sync script for on-demand provisioning
  • Log some data about the user to an alternate audit log

I’m really interested to hear some feedback on this – in particular:

  • Would something like this be useful to deploy in production?
  • What other scenarios / scripts could you use this for?


Introducing ClaimGrabber

Download ClaimGrabber Here

I’ve been working with AD FS for several years now and it’s become obvious that there are so many different scenarios and use cases for claims-based identity that it will rarely be a “point and click” deployment.  I’ve seen a need for multiple tools that can tremendously help in this space.  So, outside of my day job at Microsoft, I’ve been busy working on creating quite a few AD FS 2.0 tools. In this post, I want to introduce you to the first tool in this suite - ClaimGrabber.  Before reading on, please note that this is something that I created on my own time and is not supported nor endorsed by Microsoft.

Testing Claim Rules

Often times when deploying AD FS and configuring Relying Party trusts, you author claim rules, but don’t really have an effective way to test them. The Claims UI in AD FS will help somewhat, providing syntax checking for claim rules for instance. But how can you test the rule itself to ensure that the resultant claims are what you expect?  Sometimes, AD FS administrators will develop the claim rules in a separate lab environment and use a sample WIF application from the WIF SDK to test what claims are getting passed through. This has gotten the job done, but the process is laborious and you often don’t have access to the true source of the claim data in the lab environment.  Also, this only provides insight into the claims being passed for the sample app, not other existing apps that trust AD FS.

Claims for Existing Relying Parties

This process for existing applications is also somewhat painful. If you’re federating with SharePoint 2010, you’ll build some claims rules and then see if they work as expected by trying to browse to SharePoint and see what happens. This is an inefficient way to test claim rules because many applications will not readily tell you what claims it was given. Also, if there is a misconfiguration on the application’s side or if you are authoring claim rules for future use, you won’t have a way to test them with the application until the application is ready to receive them and use them.

The other method for testing claims passed to existing RP trusts is to use a web debugger, such as Fiddler. If your Relying Party isn’t an application, but rather another federation service, you might use Fiddler to catch the POST method while it’s being passed through your browser and then dissect the SAML token manually. If you’ve done this, you’ll know that it’s not a lot of fun weeding through a bunch of XML and trying to find a couple of claims.

How ClaimGrabber Helps

This is the reason that I created ClaimGrabber. ClaimGrabber is an application that you run directly on one of the AD FS 2.0 servers.  Basically, it impersonates both the user’s browser and application on the other end of the trust.  ClaimGrabber is really simple to use; it’s only 3 steps and there is nothing you have to install:

  1. Select the application that you want to impersonate by choosing the corresponding trust from the drop down list
  2. Enter the credentials of the user that you want to see the claims for
  3. Click the “Grab Claims!” button

ClaimGrabber will attempt to log on by passing the application’s URN into the wtrealm query string parameter of the AD FS logon page’s URI. When AD FS responds with the web form that is used for POSTing the SAML token to the application, ClaimGrabber grabs the response stream and extracts the SAML token rather than processing the javascript auto-submit function. The claims extracted from the token are then displayed in the claim list inside the ClaimGrabber tool.  Since the tool intercepts the POST-back, it doesn’t matter whether or not the application is actually accessible or even whether it’s a real application. Therefore, ClaimGrabber can be run against your existing list of RP trusts and show you what claim data is being sent to those RPs.

Requirements

Here are the requirements for running ClaimGrabber:

  • ClaimGrabber must be run directly on one of the AD FS 2.0 servers  
  • The user account that launches ClaimGrabber must be an AD FS administrator. Please note that this is different from the account that you are using to log on to the RP with. ClaimGrabber allows you to specify the user that you log on with in the UI.

Improvements

There are a couple of things that the tool doesn’t do, but are on my list for a future update:

  • Encrypted Tokens - Currently, ClaimGrabber cannot handle encrypted SAML tokens.  In a later revision, I’ll give you the option of passing in the RP application’s encryption certificate containing the private key and have ClaimGrabber decrypt the token.
  • Non-Active Directory Identity Providers - Right now, ClaimGrabber only authenticates users against the Active Directory claims provider. I plan on adding the capability to use other claims providers, including non-ADFS providers, in a future revision of the tool.

So download it, use it, and let me know if you come across any bugs or have suggestions for improvement. Feel free to comment on this blog post with them or send me an email at ken@identityguy.com.

Download ClaimGrabber Here

Adding Claims to an Existing Token Issuer in SharePoint 2010

One of the biggest frustrations that I found when working with SharePoint and ADFS integration was that after you create the Identity Provider trust in SharePoint, you can’t add any additional claims…  or so it seems.  So after being super frustrated with this limitation, I finally just said – there’s gotta be a better way.  Turns out that there is!

Before I go through this, I want to give a shout-out to Steve Peschka’s blog post on setting up the initial trust on the SharePoint side. Steve does a great job of giving us instructions for adding the identity provider trust into SharePoint. Here’s a link to that post: http://blogs.technet.com/b/speschka/archive/2010/02/17/creating-both-an-identity-and-role-claim-for-a-sharepoint-2010-claims-auth-application.aspx.

Adding a Claim Mapping

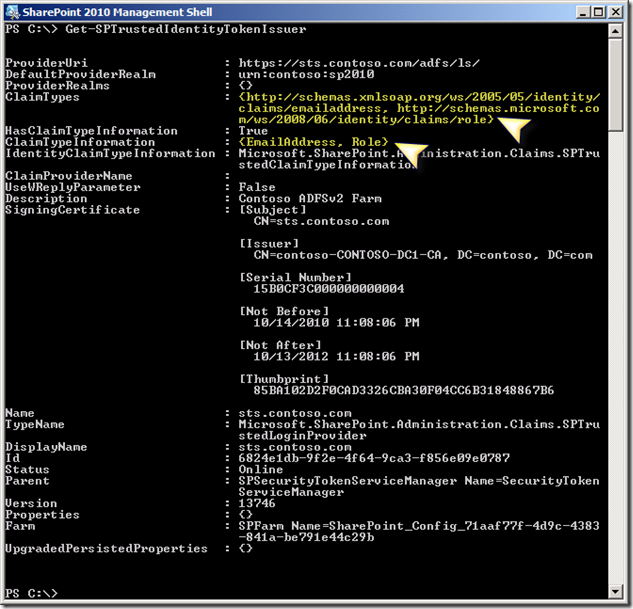
So what do you do if you’ve already created the trust and now you want to add additional claims to it? Here’s how to do it. In this example, I’m going to add the claim http://test/shoesize to identity provider trust called sts.contoso.com. Here’s the trust before the ShoeSize claim is added:

image

The first thing you need to do is stick your trust into an SPTrustedLoginProvider object:

PS C:\> $ti = Get-SPTrustedIdentityTokenIssuer sts.contoso.com

Second, you will need to add the claim type to the SPTrustedLoginProvider object and update it:

PS C:\> $ti.ClaimTypes.Add(“http://test/shoesize”)
PS C:\> $ti.Update()

Now, if you look at the trust after you add the claim type, you will see it added to the list of ClaimTypes:

image

Next, you can create the claim mapping:

PS C:\> $map3 = New-SPClaimTypeMapping –IncomingClaimType “http://test/shoesize” –IncomingClaimTypeDisplayName “ShoeSize” –SameAsIncoming

Finally, you will need to add the claim mapping to the trust:

PS C:\> Add-SPClaimTypeMapping –Identity $map3 –TrustedIdentityTokenIssuer $ti

Now you should be able to run Get-SPTrustedIdentityTokenIssuer and see your new claim mapping.

image

So now we can go into SharePoint and use the claim:

image

Removing the Claim Mapping

OK, so you know how to add claims, but what about removing them?  The process is actually the same in reverse.

First, you need to put the trust into an SPTrustedLoginProvider object, just like you did above:

PS C:\> $ti = Get-SPTrustedIdentityTokenIssuer sts.contoso.com

Next, you will need to put the claim mapping into an object. In this example, I’m going to use the same mapping that we just added, ShoeSize:

PS C:\> foreach ($c in $ti.ClaimTypeInformation) { if ($c.DisplayName –eq “ShoeSize”) { $mapping = $c; } }

What I’m doing here is enumerating through the list of claim mappings and looking for the one whose DisplayName is “ShoeSize”. When I find it, I’m putting it into a variable called $mapping.

Next, you can run the command to Remove the mapping from the trust:

PS C:\> Remove-SPClaimTypeMapping –Identity $mapping –TrustedIdentityTokenIssuer $ti

Now, your trust should have the mapping removed, however the claim type is still there:

image

So as a final step, we’ll need to remove the claim type from the list:

PS C:\> $ti.ClaimTypes.Remove(“http://test/shoesize”)
PS C:\> $ti.Update()

And that’s it – your claim mapping should be gone:

image

Access OWA with ADFS

One of the biggest advantages of using ADFS for your web applications (or any federated identity product for that matter) is that you can take advantage of the claims being passed to the application in the token. This data can be used by the application for making decisions about what the user will see – in other words, authorization. Or that identity data could be used for user personalization – such as displaying the text “Welcome, Ken”.

But what if your application doesn’t support claims? Do you need to rewrite it? In some cases, the answer is no – and what I’m talking about here today is one of those cases. You see, it is possible to use ADFS on applications that aren’t claims-aware, and what better to illustrate that on than Outlook Web App. In this post, I’m going to show you how to enable ADFS v2 for logging on to Outlook Web App in Exchange Server 2010.

The Mechanics of How This Works

Before we get started, let me explain a little bit about how this works. Outlook Web App is just like any other ASP.Net application – it uses IIS for hosting the site, which means that IIS also handles authentication for the web app.

Now, typically, applications that are claims aware use Windows Identity Foundation (WIF). WIF is the API that does all of the token-handling things that the application needs to happen. If I want to use ADFS and claims-based access in my application, I would use WIF as a fundamental component of that app. WIF would do a lot of the heavy lifting so my app doesn’t have to. For example, WIF would take care of receiving the token from ADFS, verifying that it’s legitimate, and even taking the claims out of it and making them consumable by my application.

WIF uses an HTTP module that listens for unauthenticated requests to the application and then takes over. For example, if I access an application without having logged in already, WIF will step in and take care of redirecting me to the ADFS server that it trusts – whom I might use for authentication. We add this HTTP module to an application by putting it in the app’s web.config file. Easy enough.

So what happens after I’m authenticated and my federated identity token is returned to the app? Typically, the token would be validated and parsed so that the claims can be used. However, let’s say that I’m using an app like OWA. OWA doesn’t know anything about claims and tokens, so if I gave it an ADFS token, it wouldn’t know what to do with it.

So what can we do? In older versions of ADFS (v1), there was an agent that you could install on the web server called the NT Token agent. This agent would sit on the server as an ISAPI filter, and after the token is passed to the server, it would map it to an Active Directory account and create an NT token for the user. This effectively turned an ADFS token into an NT token. This way, the application did not require claims – any old app could use ADFS for authentication. The only requirement was that an account has to exist in Active Directory for the user.

The NT Token agent got canned with ADFS v1 and is no longer available in ADFS v2. Some people found this disappointing, but one thing that many people missed is that we now have something even better. When you install WIF on a server, it installs a new Windows service that is Disabled by default. This service is called the Claims to Windows Token Service – or C2WTS. This service effectively does the same thing as the NT Token agent used to do – it turns an ADFS token into a Windows token. However, this time it doesn’t use an NT token – rather, it uses Kerberos Constrained Delegation (KCD) to request a Kerberos ticket on behalf of the identity specified in the UPN claim of the token. The target scenario of this capability is being able to use Kerberos delegation from a claims-based web app to a back-end system such as SQL Server.

Now, if we enable the C2WTS service, it basically steps in when a token is received, gets a Kerberos ticket, and passes it to the app instead. Since OWA is an ASP.Net application, and since it can use Windows Integrated Authentication, there is no reason why we should not be able to configure this in OWA.

Configuring OWA for ADFS

At a high level, here are the things that we are going to do to federate OWA with ADFS:

  • Make sure OWA works fine without ADFS first
  • Install WIF on the Exchange Client Access Server
  • Configure the OWA web.config file to use the WS-Federation Authentication Module supplied by WIF
  • Enable and configure the Claims to Windows Token Service
  • Configure the Relying Party trust in ADFS

Step 1: Make Sure that OWA is Working Without ADFS

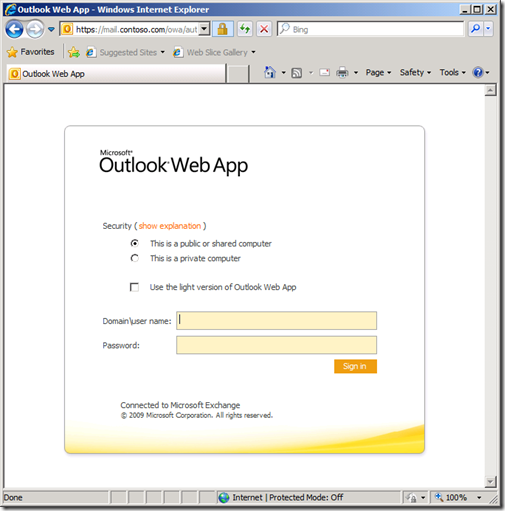
This may be common sense, but it’s a good idea to make sure that OWA is working normally before getting started. In this example, I’ve installed Exchange 2010 on a server called CONTOSO-EX1 and URL for OWA is mail.contoso.com. As you can see, when I browse to OWA, I’m prompted for my Active Directory credentials in Exchange’s Forms Based Authentication page.

image

Step 2: Install Windows Identity Foundation

The next thing to do is to install Windows Identity Foundation on the Client Access Server. You can download WIF from here. After you install WIF, you should see a new service on the Client Access Server called the Claims to Windows Token Service. This service is not enabled by default. This is what we will be using to turn our SAML token into a Kerberos ticket.

image

Step 3: Install the Windows Identity Foundation SDK

You installed WIF in the previous step, so you may be wondering why you need the SDK. There is one tool included in the SDK that you need – FedUtil.exe. If you have the SDK installed somewhere else, you can just grab that tool from the SDK and copy it to the Client Access Server. Otherwise, you can download the WIF SDK from here and install it on the Client Access Server. After you install the WIF SDK, you should have FedUtil in the “c:\Program Files (x86)\Windows Identity Foundation SDK\v3.5\” folder.

image

Step 4: Configure OWA

Now, you need to run the utility called FedUtil.exe. This tool will update the web.config file for OWA and configure it to trust the ADFS server. You will find the tool on the Client Access Server under “c:\Program Files (x86)\Windows Identity Foundation SDK\v3.5\”. When you run FedUtil.exe, you will get the following dialog:

image

For the Application Configuration Location field, enter the path to the OWA web.config, which will be “c:\Program Files\Microsoft\Exchange Server\V14\ClientAccess\Owa\web.config” if you are using a default installation of Exchange.

In the Application URI field, enter the URL for OWA – https://mail.contoso.com/owa in my example.

After you click Next, you will need to enter the URL of your ADFS server so FedUtil can grab the federation metadata file. You can just type in the DNS name of the ADFS service, and FedUtil will fill in the rest.

image

You can walk through the rest of wizard, leaving everything else at the default value. If you were to browse to OWA now, you would see that the authentication module is working, and it will redirect you to the ADFS server instead of presenting you with the OWA forms-based logon page. You can see from the following screen capture that I’m being asked to logon at sts.contoso.com (the ADFS server) instead of mail.contoso.com (the Exchange server).

image

However, we don’t have the ADFS side of the trust configured yet. And even if we did, OWA would get the SAML token back from ADFS and not know what to do with it because we didn’t configure C2WTS yet.

But before we do, there is one other thing we have to do in OWA. We need to turn off Forms Based Auth. In the Exchange Management Console, open your OWA authentication settings dialog and tell OWA to use IIS. You can get to this dialog by choosing Server Configuration > Client Access, and then select the OWA virtual directory in the bottom pane of the Exchange Management Console.

image

Just choose Properties to bring up the configuration dialog. Go to the Authentication tab and set the option to “Use one or more standard authentication methods”.

image

Then, you’ll need to go into IIS on the Client Access server and enable Anonymous Authentication on the OWA virtual directory. To do this, open IIS Manager, browse to the OWA virtual directory, and double-click on the Authentication icon.

image

Set the Anonymous Authentication setting to Enabled. After you are done, make sure that you run iisreset.

image

Step 5: Configure C2WTS

There are a few things that you need to do to configure C2WTS. The first is to configure the service and turn it on. To configure it, you will need to allow the Exchange server to use it by modifying C2WTS’es configuration file. You will find this file in “C:\Program Files\Windows Identity Foundation\v3.5\c2wtshost.exe.config”. Open the file in Notepad, and uncomment the following line:

image

Save the file, and then set the C2WTS service to Automatic and start it up.

image

The second thing is that you need to go back into the OWA web.config file and tell WIF to use C2WTS to turn the SAML token into a Windows token instead of giving the SAML token back to OWA directly. So go back into OWA’s web.config file, scroll all the way down near the bottom, and add the following text into the Microsoft.IdentityModel element under the Service element:

<securityTokenHandlers>
 
<add type="Microsoft.IdentityModel.Tokens.Saml11.Saml11SecurityTokenHandler, Microsoft.IdentityModel, Version=3.5.0.0, Culture=neutral, PublicKeyToken=31bf3856ad364e35">
   
<samlSecurityTokenRequirement mapToWindows="true" useWindowsTokenService="true" />
  </add>
</securityTokenHandlers>

Two main things that we’re adding here are the parameters mapToWindows and useWindowsTokenService. These two things enable OWA to use C2WTS. Here’s a screen capture of the modified file after the text was added:

image

Step 6: Set up Relying Party Trust in ADFS

The last step is to add the Relying Party side of the trust in ADFS. You can do this using the standard Add Relying Party Trust wizard in ADFS and using OWA’s Federation Metadata file, which was created in step 4 when we ran FedUtil. In the RP trust wizard, enter the URL for OWA. The wizard will take care of finding the Federation Metadata file, so you don’t have to specify the full path to it.

image

You can just specify the default values for the rest of the wizard. After you are done, you may get the Claims Rules dialog for the trust. If you do, you can just close it for now.

In order for C2WTS to work, you need to pass a UPN claim in the SAML token. C2WTS uses the UPN claim to look up the user that you want to create the Windows Token for in Active Directory. So, now we need to configure a couple of claim rules to get the UPN out of Active Directory and into the SAML token passed to OWA.

First, we need to make sure that the UPN claims is coming in from Active Directory.

  1. In ADFS, go to your Claims Provider Trusts, select the Active Directory claims provider, and choose Edit Claim Rules.image
  2. In the Edit Claim Rules dialog, click the Add Rule button.
  3. In the rule wizard, choose the “Send LDAP Attributes as Claims” template
  4. In the rule configuration screen, select the Active Directory attribute store and choose to send LDAP attribute User-Principle-Name in the Outgoing Claim Type labeled UPN, as shown in the following screen capture.
    image

The second thing we need to do is to configure ADFS to pass the UPN claim to OWA.

  1. In the ADFS Management Tool, go to the Relying Party Trust that you created for OWA and choose to edit the claim rules there.
    image
  2. In the Issuance Transform Rules tab, click the Add Rule button.
  3. In the rule wizard, use the template called Pass Through or Filter an Incoming Claim
  4. In the Incoming Claim Type field, select the UPN claim and choose “Pass through all claim values”, as shown in the following screen capture:
    image

Trying it Out

Now that everything is configured, we can try it out. Before you do, make sure that the account you are testing has a valid mailbox in Exchange and also has the UPN attribute populated in Active Directory.

Using my client, I will browse to https://mail.contoso.com, and I am re-directed to ADFS to log in. I’ll log in with my user’s credentials:

image

And voila… I’m now logged into OWA via ADFS -

image

Enjoy!

Populate your Active Directory Lab in a Flash

Need to populate an AD lab with a bunch of users quickly? Here's a quick tip to automatically create lots of users with little effort. I use this PowerShell one-liner to populate labs pretty regularly. You'll need to do this on Windows Server 2008 R2 with Active Directory PowerShell installed and your DC needs to be running 2008 R2 or 2003/2008 with the AD Management Gateway installed.  Open up a PowerShell session with the Active Directory modules imported:

PS C:\> Import-Module ActiveDirectory

… and then run the following command:

PS C:\> for ($i=0; $i -lt 1000; $i++) { New-ADUser -SamAccountName user$i -Name User$i -UserPrincipalName user$i@contoso.com -AccountPassword (ConvertTo-SecureString -AsPlainText P@ssw0rd -Force) -Enabled $true)

This one-liner will create 1000 enabled user accounts named User0 – User999 with the password of P@ssw0rd. You can adjust the range of user IDs by changing the the $i=0; $i –lt 1000; part of the for loop to the range that you want. For example, if you want to create User2534 – User3145, you would change it to ($i=2534; $i –lt 3146; $i++).

On a modest virtualized Domain Controller (single CPU @ 2.66 GHz and 1GB RAM) I can create 1000 enabled users in about 2 minutes and 14 seconds, which is around 7-8 users per second.  Not super fast, but enough to get a quick lab populated. I’ve used this one-liner in the past to create 1,000,000+ user environments for some virtualization testing and other things. It takes me about a day and a half to get 1,000,000 users created on my modest virtualized DC.

This is also a quick way to bloat your DIT if you want to do some scale and performance testing. To make your DIT bigger, you would want to inject some other data into these accounts, so in this command, you might add some additional attributes such as –DisplayName, –GivenName, –Surname, –Description, etc.

Federation Woes - ADFS v2 and Oracle

The other day, I was working on a proof of concept for a customer who wanted to do some identity federation testing between Oracle, IBM, and ADFS version 2. In this configuration, we were working with an architecture that resembled the following:

clip_image001[7]

Going into this, I thought this was a no-brainer - after all, ADFS v2 passed IdP Lite, SP Lite, and eGov SAML profile testing. The ADFS v2 configuration went smoothly. I got the metadata file from Oracle and imported with no issues. There were no problems whatsoever setting up the RP trust on my end. Here's a screen capture of my endpoint configuration:

clip_image002[5]

However, when it came time for Oracle to import the ADFS v2 metadata file, we ran into issues. When Oracle tried to import our FederationMetadata.xml file, they were getting the following error:

org.xml.sax.SAXException: Could not locate translation scheme associated with "http://docs.oasis-open.org/wsfed/federation/200706":ApplicationServiceType, child of "urn:oasis:names:tc:SAML:2.0:metadata"

As it turns out, the Oracle SP doesn't support harmonized data in the SAML metadata format. By default in ADFS v2, we expose both the SAML and WS-Federation endpoints in our FederationMetadata.xml file. In the screen capture below, you can see that the RoleDescriptor elements contain the data for our WS-Fed endpoints. The SAML 2.0 metadata spec does allow this. It’s defined in section 2.4.1 of the SAML Metadata 2.0 format specification.

clip_image003[6]

So I manually removed the RoleDescriptor elements and re-sent the FederationMetadata.xml file back over to Oracle. So now, the file only had the SPSSODescriptor and IDPSSODescriptor elements, which are used to define only the SAML endpoints. The below screen capture shows the edited file:

clip_image004

So I sent this file back to Oracle and voila… a different error:

javax.management.RuntimeMBeanException: javax.management.RuntimeMBeanException: The Signing Certificate could not be validated. Could not add metadata at weblogic.rmi.internal.ServerRequest.sendReceive(ServerRequest.java:205)

As anyone reading the above error would assume, I read this and thought they were having issues with our token signing cert. So I sent them over a copy of the .cer file and they imported it into their certificate store, but it still didn't work. I wasn't sure what else we could do on the Microsoft side, so I tabled this for a few days, waiting for Oracle to come up with an answer as to why they couldn't import the file.

A few days later, I was sitting at Panera Bread having lunch and working (as is my usual fare) when I suddenly realized that I never regenerated the signature on the metadata file! Doh! So after consulting with the trusty (pun intended) ADFS product group on the best way to regenerate that signature, I took their advice to try removing it altogether. I opened the FederationMetadata.xml file, deleted the signature element (the ds element) and sent it back over to my new buddy Matt at Oracle.

I tell you, I heard the church bells ringing that day - the file worked and the world gasped in silence for a nanosecond as Microsoft and Oracle came together in harmony. Here's a screen capture of the metadata file with the signature removed:

clip_image005

So here are the lessons learned when federating ADFS v2 with Oracle Identity Federation:

  • Don't use the FederationMetadata.xml file unless you want to modify it
  • If you do use the FederationMetadata.xml file, remove the WS-Fed RoleDescriptor elements and don't forget to remove or regenerate the signature on the file
  • Don't take java error messages at face value … I know, I know - we're guilty of that too, sometimes :)

I swear I could hear Laura Hunter across the US… "So it was both PKI AND a typo" Special thanks to Matt @ Oracle!

Figuring out What’s in the PAS

The other day, someone asked me what attributes in Active Directory are a part of the set of attributes that is replicated in the Global Catalog, also known as the Partial Attribute Set (PAS). To answer this question, let’s take a step back first. Let’s first look at the concept of partitions or naming contexts (NC) in Active Directory. A NC is a segment of the directory that contains information used for a common purpose and sometimes has a unique replication. There are 3 default Naming Contexts in Active Directory:

· The Schema NC holds the definition of the objects and attributes used to describe objects in the directory

· The Configuration NC holds data about the configuration of the Active Directory forest, such as the site topology

· The Domain NC contains information about a domain in the forest. This includes the objects in the domain, such as users, computers, etc. Each DC has a copy of the Domain NC for the domain that it belongs to.

There are also other NCs in Active Directory that you can use for application data. These are commonly called “application partitions” and they can be used for AD-integrated applications to store data in. The most common use of an app partition is AD-integrated DNS. DNS records are stored in an app partition and you can therefore specify its scope of replication, meaning that you can choose which Domain Controllers get a copy of the partition. Up until Windows Server 2003, application partitions didn’t exist and all of the data that AD held was in one of the three NCs that I defined above. DNS records, for example, were kept in the Domain NC, and that sometimes caused problems if you were in the situation where you wanted both a root and child domain to have a copy of an AD-Integrated zone. Since the DNS data was in the domain partition, only one of the domains could hold the DNS unless you went outside of AD replication and used zone transfers. Putting DNS records in an app partition solved this problem. For now, however, I’m going to put aside app partitions and just discuss the NCs that I mentioned earlier.

Why We Need the GC

Of the three NCs that I outlined above, only two of them get replicated to every Domain Controller in the forest – the Schema and Configuration NCs. This makes sense, as every domain in the forest uses the same schema and configuration data (i.e. site topology). The Domain NC, however, is only replicated among Domain Controllers within that domain. So what happens if a user or process in one domain in a forest needs to search for data in another domain in the forest? Since the Domain NCs are only kept on the DCs that own the domain, the search would have to take place on a DC in the other domain. This can become problematic if you want to search for data across the entire forest because you have to search in every domain.

The Global Catalog (GC) solves this problem by providing some information about the objects in every domain to all of the other domains. To understand how this works, let’s take a quick look at how the schema works. The database file that AD stores its data in is called NTDS.DIT. This database is a Jet database, which is a technology that Microsoft has owned for many years. Wrapped around this database is an engine for reading and writing data to and from the database. This engine is called the ESE (Extensible Storage Engine). The job of the ESE is to perform operations on the database so the application doesn’t have to open the database file directly and read and write data to it itself. The ESE enforces standard semantics on the data – things like ensuring that the data being written to the database doesn’t break the rules of the database. The ESE also puts some logic into the database allows for the transactional data model used in AD. This is the same data model used in Exchange server – the ESE enforces this. The ESE keeps transaction logs and ensures that the atomicity of the data is kept. For example, it ensures that either the entire operation is written to the database or none of it is written to the database. This guards the database against things like data corruption.

There are several tables inside of the NTDS.DIT database file. In Windows Server 2008 R2, there are 12. Some older versions of AD have fewer tables. The primary table that the data is held in is the table called “datatable”. Inside this table there is a row for every object in AD. Each column in the “datatable” table represents an attribute of the object. The schema is what defines each of these columns. A quick look at a Windows Server 2008 DC that I had running in a lab showed that there were 2,190 columns in my “datatable” table. Each object in AD is a row in this “datatable” table. Not every row has data in all of the columns. The Directory System Agent (the DSA) ensures that these columns aren’t filled in for a row that shouldn’t use it. For example, if you create an attribute called “ShoeSize” and only specify that “User” objects can use that attribute, then the DSA will ensure that the “ShoeSize” column can only contain data for rows that contain “user” objects. The interface used for accessing AD data (ADSI) ensures that every operation goes through the DSA, so people can’t break the rules.

How Attributes Are Defined

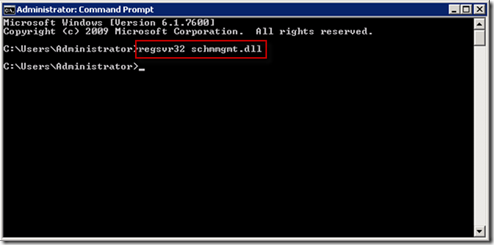
Each of these attributes (columns) in the directory has a list of properties that define how the attribute behaves – for example, the kind of data stored in the attribute or whether it’s indexed or not. The ata about each of these attributes is stored in the Schema NC. Each attribute has an object in the Schema NC called an attributeSchema object. One of the properties on the attributeSchema objects is the “isMemberOfPartialAttributeSet” property. This boolean (true or false) property defines whether or not the attribute is replicated as part of the Global Catalog. So if you want Domain Controllers for every other domain in the forest to have a copy of this attribute, you just set the isMemberOfPartialAttributeSet property to TRUE. The easy way to do this is through the Schema MMC snap-in. Before you can use it, you have to register it – run the following command from a command prompt:

clip_image001

Then open the Schema MMC and browse to an attribute object. Open the properties on the object and you’ll see the “Replicate this attribute to the Global Catalog” setting. If you check this box, the isMemberOfPartialAttributeSet object gets set as TRUE and this attribute is replicated to all DCs in every domain of the forest.

clip_image002

Listing All of the Attributes in the PAS

So let’s go back to the question at hand – how can we find out which attributes are in the PAS? Since we now know that this is actually defined by an attribute on the attributeSchema object, we can just do a search in the Schema NC for every object that has this value set to TRUE. One way to do this is to open up ADSIEdit.msc and do a custom query in the schema partition:

isMemberOfPartialAttributeSet=TRUE

Here’s the output from running this query on one of my WS08 R2 Domain Controllers:

clip_image004

Happy Schema-Editing!

Managed Service Accounts

Managed Service Accounts (MSAs) are a new feature in Windows Server 2008 R2. The concept is that the service account is managed by the server that’s using it. This can be very useful, as administrators will not be required to update passwords on these service accounts, and in some cases, the SPNs will be managed for you as well. To use an MSA, use basically create the service account object in Active Directory and configure the server to use the account. There are a couple of things you need to be aware of when using MSAs:

  • MSAs can only be used on servers running Windows Server 2008 R2 or Windows 7.
  • You are required to update the AD schema to WS08 R2.
  • If using the automatic SPN management feature, your domain must be at Windows Server 2008 R2 domain functional level.
  • MSAs can only be used on one server at a time, though you can have one server using multiple MSAs.
  • MSAs should only be managed through the AD Module in PowerShell. Do not use the AD GUI tools or edit the directory directly for MSA objects.

Let’s take a deeper look at how MSAs work and how you can use them.

The MSA Object

MSAs are a new object class in AD called msDS-ManagedServiceAccount, which is a subclass of the Computer class. As you probably know the inheritance structure of the Computer class is:

Top > Person > OrganizationalPerson > User > Computer

This means that MSAs inherit the same attribute classes that Computer objects have. But if you look at the object class in the schema, you’ll notice that there are no added mandatory or optional attributes, nor are there any auxiliary classes added. So the difference between msDS-ManagedServiceAccount objects and Computer objects are minimal.

clip_image002[4]

Password Changes

MSAs also don’t adhere to standard user password policies. You can’t set a fine grained password policy or control the complexity of the password for a MSA. It’s a hard-coded 240 character password that’s randomly generated. When an MSA is installed on a server, that server updates the MSA password using the same process that it uses to update its computer account password. Therefore, you can’t set password policies on the service account object itself. The password is reset every 30 days by default. To change this, you must update the policy for machine account password changes. In the registry, this is the following value:

HKLM\SYSTEM\CurrentControlSet\Services\NetLogon\Parameters\MaximumPasswordAge

Or change the setting in the server’s GPO under:

Computer Configuration\Policies\Windows Settings\Security Settings\Security Options\

Domain member: Maximum machine account password age

clip_image004[4]

Using MSAs

There are basically 4 steps to using an MSA on your server.

Step 1: Meet the prerequisites

There are a couple of prerequisites that must be in place before you can use MSAs. First and foremost, your AD schema must be updated to Windows Server 2008 R2. You are not required to have Windows Server 2008 R2 DCs, unless you want to use the automatic SPN functionality. If you do want the automatic SPN functionality, your Domain Functional Level needs to be at WS08 R2.

Also, the server that the MSA will be used on requires the AD PowerShell Module and .Net framework version 3.5.1. To install these features, open PowerShell with the system modules imported and run the following commands:

Add-WindowsFeature RSAT-AD-PowerShell

Add-WindowsFeature NET-Framework-Core

If you don’t have the Add-WindowsFeature cmdlet available, make sure that you opened the PowerShell with the system modules imported. To do this, right-click on the PowerShell icon and select Import System Modules:

clip_image005[4]

Step 2: Create the Managed Service Account

Open PowerShell with the AD module (Start > Administrative Tools > Active Directory Module for Windows PowerShell) and run the New-ADServiceAccount cmdlet. The only parameter that you need to specify is the name of the service account that you are creating. When the account is created, the samAccountName will have a $ appended to the end of it, just like computer accounts.

PS C:\> New-ADServiceAccount svc_app

After you create the account, you can verify it by running the Get-ADServiceAccount cmdlet.

PS C:\> Get-ADServiceAccount svc_app
DistinguishedName : CN=svc_app,CN=Managed Service Accounts,DC=contoso,DC=com
Enabled : True
HostComputers :
Name : svc_app
ObjectClass : msDS-ManagedServiceAccount
ObjectGUID : 7a39e2fa-eb62-4ed9-83be-c974afb493f3
SamAccountName : svc_app$
SID : S-1-5-21-3140640322-4110138197-1547801364-1118
UserPrincipalName :


Step 3: Install the Managed Service Account on the server


Now that the account is created, you can install it on the server that will be using it for a service. Open the AD PowerShell on the server and run the Install-ADServiceAccount cmdlet.

PS C:\> Install-ADServiceAccount svc_app

Now, if you run the Get-ADServiceAccount cmdlet again, you will notice that the service account is tied to a specific computer.

PS C:\> Get-ADServiceAccount svc_app
DistinguishedName : CN=svc_app,CN=Managed Service Accounts,DC=contoso,DC=com
Enabled : True
HostComputers : {CN=CONTOSO-SRVR,CN=Computers,DC=contoso,DC=com}
Name : svc_app
ObjectClass : msDS-ManagedServiceAccount
ObjectGUID : 7a39e2fa-eb62-4ed9-83be-c974afb493f3
SamAccountName : svc_app$
SID : S-1-5-21-3140640322-4110138197-1547801364-1118
UserPrincipalName :


You may be curious about that HostComputers attribute. Where did that come from? I showed earlier that the msDS-ManagedServiceAccount object class didn’t add any additional attributes to the Computer class that it is inherited from. So where is this HostComputers attribute defined?

It’s actually defined in two places - the computer object that the service is installed on and the managed service account object. If you look at the objects in AD, you will see the msDS-HostServiceAccount attribute on the computer object and the msDS-HostServiceAccountBL attribute on the managed service account object. This attribute is a linked attribute, so it has both the forward link (msDS-HostServiceAccount) and the backlink (msDS-HostServiceAccountBL).

clip_image007[4]

So the attribute is obviously defined on the MSA object, but we saw earlier that the MSA object doesn’t contain any additional attributes over the computer object. So that means that these attributes were injected as optional attributes into pre-existing object classes. Namely, the Computer object class and the Top object class.

clip_image009[4]

Step 4: Configure the service that will be using the MSA

The last step to using the MSA is to configure the service to use the account. You can do this through a couple of different ways - but the easiest is just to use the Services snap-in. When you add the account to the service, ensure that the account name has the $ at the end and leave the password blank.

clip_image011[4]

One thing that you may notice is that if you click the Browse button in the service configuration dialog, the Service Accounts option shows up in the object picker.

clip_image013[4]

clip_image015[4]

If you decide to configure the service with the MSA through another means, such as SC.EXE, you need to ensure that you grant the MSA permissions to logon as a service. This is done through the SeServiceLogonRight, which can be applied in the local security policy or through a GPO on the server.

My Thoughts

Managed Service Accounts are an interesting feature and I definitely think there is a need for them. However, much of what I have been seeing about MSAs is focused on how much money they will save you. Whenever something is automated, there is some cost savings (unless the management of the automation process itself is a bigger chore than manually administering the thing that you automated). But I think there is one shortcoming with the way MSAs have been implemented that limits its ability to help you saving money.

This shortcoming is that the account can only be used on one computer. How does this limit cost-savings? First ask yourself how service accounts are costing you bucks. Some might say that your admins waste time updating service account passwords. I think that argument is a red herring. If admins have to update service account passwords across multiple computers every couple of months that may cost you a few bucks. So you can spend some more money and buy some 3rd party software to take care of it for you, or you can take the “cost avoidance” approach. You know what I mean - use the “Password never expires” check box for your service accounts. A lot of people take the route of setting an obscenely large password length policy for your service accounts and not think about changing them. Granted, this offers a false sense of security in many ways, but hey - a longer complex password is harder to guess and takes longer to brute force.

However, if you are using shared service accounts and if you do change the password regularly, I do think there is some cost savings. But it’s not exactly in admin time - rather it’s in the server outages incurred by mistyped passwords or servers that the admin forgot to update the password on. The real damage happens when something causes those services to restart - this could be days or weeks from when you changed the service account password, so you may not immediately realize that the incorrect password is preventing the server from functioning. So I think you can get some cost savings by automating shared service accounts. However, MSAs can’t be shared between servers - therefore, no cost savings in this scenario.

So what’s the benefit, then? I think the benefit lies more with security than with cost savings. There are two primary reasons that I believe this. First, if you have a service running on one server, you can implement an MSA and have the password changed regularly. Changing passwords on a regular basis is one way to increase security. But the second and most impactful reason why MSAs boost security is that admins will no longer be able to logon interactively with service accounts. Sure, you can prevent this with GPOs now, but that process can be circumvented. On the other hand, with MSAs, it’s basically a computer account and the admin doesn’t know the password. I think there is a great benefit with that.

To sum it all up - Managed Service Accounts are good and I am definitely a fan. I do think however, that there could be some improvements that would make them more effective - namely, allowing MSAs to be shared across multiple servers.

Using Proxy Authentication Across Trusts

Back in December 2008, I wrote an article for Technet Magazine called “Understanding Proxy Authentication in AD LDS”. In this article I explained how proxy authentication works, walked through a couple of network traces, and took you through setting up your own proxy authentication lab that you can experiment with. Since then, I’ve received quite a few emails about this article and one of the common questions I’ve been asked is “Does this work across trusts?”.

The answer is yes, this does work across trusts. Here’s the scenario looks:

Using Proxy Authentication Across Trusts - figure1

In this scenario, the LDS directory with the proxy objects are in the Contoso domain. However, the users that you want to proxy are in the Fabrikam domain. So even though the user account that you are proxying authentication to through AD LDS doesn’t exist in the same forest as LDS, you can still tie that user to an LDS userProxy object. The concept is simple, but this works in the opposite way that you would expect. What do I mean by this? In the most common scenarios, you might have a forest for user accounts and a separate forest for resources.  The account forest is typically trusted by the resource forest. This is so the resources in the resource forest (e.g. a file share) can give the account in the account forest permissions. In the example of a file share, that account in the account forest has its SID added to the share’s ACL. This common configuration is illustrated in the figure below.

Using Proxy Authentication Across Trusts - figure2

However, this is not how it works in proxy authentication.  If you had LDS installed in the scenario above, you would probably consider the LDS directory to be a resource and include it in the resource forest. If you have the trusts configured in this manner, where the LDS forest trusts the forest with the user objects that you are proxying authentication to, your userProxy authentication will not work across that trust. The reason for this is because LDS isn’t treated as a resource in this scenario. Rather, LDS is storing the SID of the account in the account forest and telling the account forest to do the work of authenticating the user. Therefore, the resource forest needs to be trusted by the account forest and not the other way around.

Using Proxy Authentication Across Trusts - figure3

So going with my example above, the Contoso domain needs to have an Outgoing trust to the Fabrikam domain, and the Fabrikam domain needs an Incoming trust from Contoso. After that, you can use the normal process for configuring userProxy objects, which I outlined in my article that mentioned earlier. You can check out that article by clicking here.